ResNet in Tensorflow
This implementation of resnet and its variants is designed to be straightforward and friendly to new ResNet users. You can train a resnet on cifar10 by downloading and running the code. There are screen outputs, tensorboard statistics and tensorboard graph visualization to help you monitor the training process and visualize the model.
Now the code works with tensorflow 1.0.0 and 1.1.0, but it's no longer compatible with earlier versions.
If you like the code, please star it! You are welcome to post questions and suggestions on my github.
Table of Contents
Validation errors
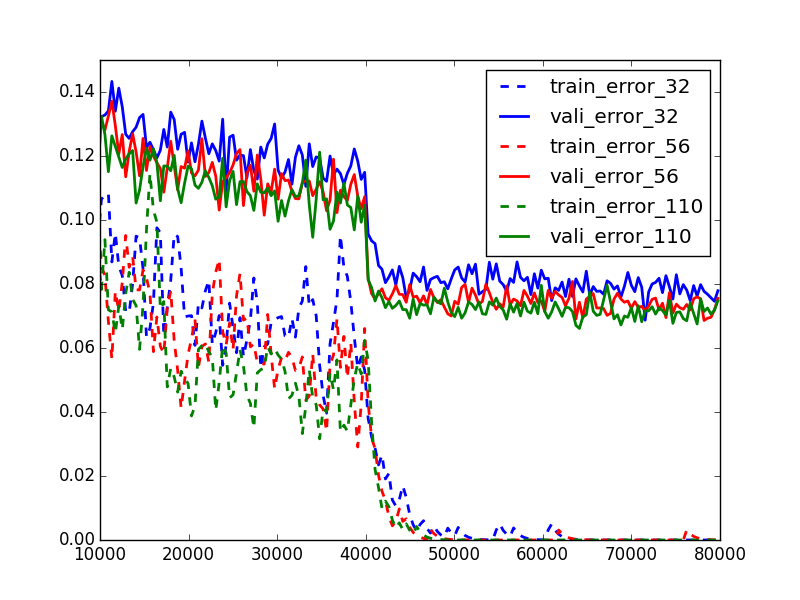
The lowest valdiation errors of ResNet-32, ResNet-56 and ResNet-110 are 6.7%, 6.5% and 6.2% respectively. You can change the number of the total layers by changing the hyper-parameter num_residual_blocks. Total layers = 6 * num_residual_blocks + 2
| Network | Lowest Validation Error |
|---|---|
| ResNet-32 | 6.7% |
| ResNet-56 | 6.5% |
| ResNet-110 | 6.2% |
Training curves
User's guide
You can run cifar10_train.py and see how it works from the screen output (the code will download the data for you if you don't have it yet). It’s better to speicify version identifier before running, since the training logs, checkpoints, and error.csv file will be saved in the folder with name logs_$version. You can do this by command line: python cifar10_train.py --version='test'. You may also change the version number inside the hyper_parameters.py file
The training and validation error will be output on the screen. They can also be viewed using tensorboard. Use tensorboard --logdir='logs_$version' command to pull them out. (For e.g. If the version is ‘test’, the logdir should be ‘logs_test’.)
The relevant statistics of each layer can be found on tensorboard.
Pre-requisites
pandas, numpy , opencv, tensorflow(1.0.0)
Overall structure
There are four python files in the repository. cifar10_input.py, resnet.py, cifar10_train.py, hyper_parameters.py.
cifar10_input.py includes helper functions to download, extract and pre-process the cifar10 images. resnet.py defines the resnet structure. cifar10_train.py is responsible for the training and validation. hyper_parameters.py defines hyper-parameters related to train, resnet structure, data augmentation, etc.
The following sections expain the codes in details.
hyper-parameters
The hyper_parameters.py file defines all the hyper-parameters that you may change to customize your training. You may use python cifar10_train.py --hyper_parameter1=value1 --hyper_parameter2=value2 to set all the hyper-parameters. You may also change the default values inside the python script.
There are five categories of hyper-parameters.
1. Hyper-parameters about saving training logs, tensorboard outputs and screen outputs, which includes:
version: str. The checkpoints and output events will be saved in logs_$version/
report_freq: int. How many batches to run a full validation and print screen output once. Screen output looks like:

train_ema_decay: float. The tensorboard will record a moving average of batch train errors, besides the original ones. This decay factor is used to define an ExponentialMovingAverage object in tensorflow with tf.train.ExponentialMovingAverage(FLAGS.train_ema_decay, global_step). Essentially, the recorded error = train_ema_decay * shadowed_error + (1 - train_ema_decay) * current_batch_error. The larger the train_ema_decay is, the smoother the training curve will be.
2. Hyper-parameters regarding the training process
train_steps: int. Total training steps
is_full_validation: boolean. If you want to use all the 10000 validation images to run the validation (True), or you want to randomly draw a batch of validation data (False)
train_batch_size: int. Training batch size
validation_batch_size: int. Validation batch size (which is only effective if is_full_validation=False)
init_lr: float. The initial learning rate. The learning rate may decay based on the settings below
lr_decay_factor: float. The decaying factor of learning rate. The learning rate will become lr_decay_factor * current_learning_rate every time it is decayed.
decay_step0: int. The learning rate will decay at decay_step0 for the first time
decay_step1: int. The second time when the learning rate will decay
3. Hyper-parameters that controls the network
num_residual_blocks: int. The total layers of the ResNet = 6 * num_residual_blocks + 2
weight_decay: float. The weight decay used to regularize the network. Total_loss = train_loss + weight_decay* sume of sqaures of the weights
4. About data augmentation
padding_size: int. padding_size is numbers of zero pads to add on each side of the image. Padding and random cropping during training can prevent overfitting.
5. Loading checkpoints
ckpt_path: str. The path of the checkpoint that you want to load
is_use_ckpt: boolean. If yes, use a checkpoint and continue the training from the checkpoint
ResNet Structure
Here we use the latest version of ResNet. The structure of the residual block looks like ref:
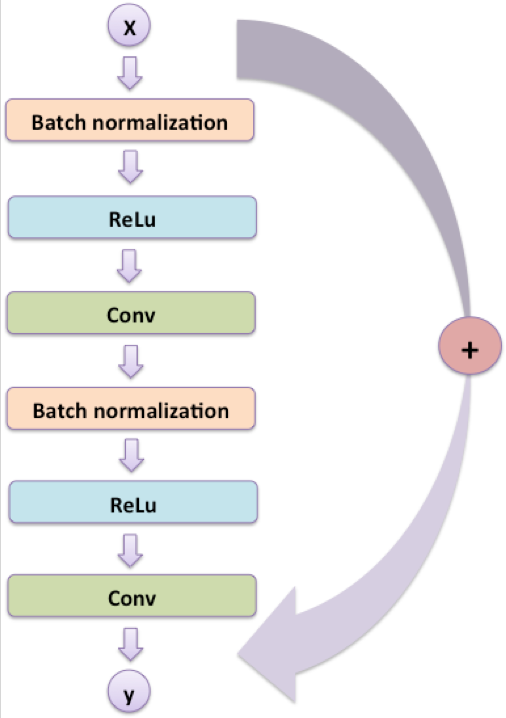
The inference() function is the main function of resnet.py. It will be used twice in both building the training graph and validation graph.
Training
The class Train() defines all the functions regarding training process, with train() being the main function. The basic idea is to run train_op for FLAGS.train_steps times. If step % FLAGS.report_freq == 0, it will valdiate once, train once and wrote all the summaries onto the tensorboard.
Test
The test() function in the class Train() help you predict. It returns the softmax probability with shape [num_test_images, num_labels]. You need to prepare and pre-process your test data and pass it to the function. You may either use your own checkpoints or the pre-trained ResNet-110 checkpoint I uploaded. You may wrote the following lines at the end of cifar10_train.py file
train = Train()
test_image_array = ... # Better to be whitened in advance. Shape = [-1, img_height, img_width, img_depth]
predictions = train.test(test_image_array)
# predictions is the predicted softmax array.
Run the following commands in the command line:
# If you want to use my checkpoint.
python cifar10_train.py --test_ckpt_path='model_110.ckpt-79999'