This Project is DEPRECATED, please use OpenPCDet or mmdetection3d instead, they both implement SECOND and support spconv 2.x.
SECOND for KITTI/NuScenes object detection (1.6.0 Alpha)
SECOND detector.
"Alpha" means there may be many bugs, config format may change, spconv API may change.
ONLY support python 3.6+, pytorch 1.0.0+. Tested in Ubuntu 16.04/18.04/Windows 10.
If you want to train nuscenes dataset, see this.
News
2019-4-1: SECOND V1.6.0alpha released: New Data API, NuScenes support, PointPillars support, fp16 and multi-gpu support.
2019-3-21: SECOND V1.5.1 (minor improvement and bug fix) released!
2019-1-20: SECOND V1.5 released! Sparse convolution-based network.
See release notes for more details.
WARNING: you should rerun info generation after every code update.
Performance in KITTI validation set (50/50 split)
car.fhd.config + 160 epochs (25 fps in 1080Ti):
Car AP@0.70, 0.70, 0.70:
bbox AP:90.77, 89.50, 80.80
bev  AP:90.28, 87.73, 79.67
3d   AP:88.84, 78.43, 76.88
car.fhd.config + 50 epochs + super converge (6.5 hours) + (25 fps in 1080Ti):
Car AP@0.70, 0.70, 0.70:
bbox AP:90.78, 89.59, 88.42
bev  AP:90.12, 87.87, 86.77
3d   AP:88.62, 78.31, 76.62
car.fhd.onestage.config + 50 epochs + super converge (6.5 hours) + (25 fps in 1080Ti):
Car AP@0.70, 0.70, 0.70:
bbox AP:97.65, 89.59, 88.72
bev  AP:90.38, 88.20, 86.98
3d   AP:89.16, 78.78, 77.41
Performance in NuScenes validation set (all.pp.config, NuScenes mini train set, 3517 samples, not v1.0-mini)
car Nusc dist AP@0.5, 1.0, 2.0, 4.0
62.90, 73.07, 76.77, 78.79
bicycle Nusc dist AP@0.5, 1.0, 2.0, 4.0
0.00, 0.00, 0.00, 0.00
bus Nusc dist AP@0.5, 1.0, 2.0, 4.0
9.53, 26.17, 38.01, 40.60
construction_vehicle Nusc dist AP@0.5, 1.0, 2.0, 4.0
0.00, 0.00, 0.44, 1.43
motorcycle Nusc dist AP@0.5, 1.0, 2.0, 4.0
9.25, 12.90, 13.69, 14.11
pedestrian Nusc dist AP@0.5, 1.0, 2.0, 4.0
61.44, 62.61, 64.09, 66.35
traffic_cone Nusc dist AP@0.5, 1.0, 2.0, 4.0
11.63, 13.14, 15.81, 21.22
trailer Nusc dist AP@0.5, 1.0, 2.0, 4.0
0.80, 9.90, 17.61, 23.26
truck Nusc dist AP@0.5, 1.0, 2.0, 4.0
9.81, 21.40, 27.55, 30.34
Install
1. Clone code
git clone https://github.com/traveller59/second.pytorch.git
cd ./second.pytorch/second
2. Install dependence python packages
It is recommend to use Anaconda package manager.
conda install scikit-image scipy numba pillow matplotlib
pip install fire tensorboardX protobuf opencv-python
If you don't have Anaconda:
pip install numba scikit-image scipy pillow
Follow instructions in spconv to install spconv.
If you want to train with fp16 mixed precision (train faster in RTX series, Titan V/RTX and Tesla V100, but I only have 1080Ti), you need to install apex.
If you want to use NuScenes dataset, you need to install nuscenes-devkit.
3. Setup cuda for numba (will be removed in 1.6.0 release)
you need to add following environment variable for numba.cuda, you can add them to ~/.bashrc:
export NUMBAPRO_CUDA_DRIVER=/usr/lib/x86_64-linux-gnu/libcuda.so
export NUMBAPRO_NVVM=/usr/local/cuda/nvvm/lib64/libnvvm.so
export NUMBAPRO_LIBDEVICE=/usr/local/cuda/nvvm/libdevice
4. add second.pytorch/ to PYTHONPATH
Prepare dataset
- KITTI Dataset preparation
Download KITTI dataset and create some directories first:
└── KITTI_DATASET_ROOT
       ├── training    <-- 7481 train data
       |   ├── image_2 <-- for visualization
       |   ├── calib
       |   ├── label_2
       |   ├── velodyne
       |   └── velodyne_reduced <-- empty directory
       └── testing     <-- 7580 test data
           ├── image_2 <-- for visualization
           ├── calib
           ├── velodyne
           └── velodyne_reduced <-- empty directory
Then run
python create_data.py kitti_data_prep --data_path=KITTI_DATASET_ROOT
- NuScenes Dataset preparation
Download NuScenes dataset:
└── NUSCENES_TRAINVAL_DATASET_ROOT
       ├── samples       <-- key frames
       ├── sweeps        <-- frames without annotation
       ├── maps          <-- unused
       └── v1.0-trainval <-- metadata and annotations
└── NUSCENES_TEST_DATASET_ROOT
       ├── samples       <-- key frames
       ├── sweeps        <-- frames without annotation
       ├── maps          <-- unused
       └── v1.0-test     <-- metadata
Then run
python create_data.py nuscenes_data_prep --data_path=NUSCENES_TRAINVAL_DATASET_ROOT --version="v1.0-trainval" --max_sweeps=10
python create_data.py nuscenes_data_prep --data_path=NUSCENES_TEST_DATASET_ROOT --version="v1.0-test" --max_sweeps=10
--dataset_name="NuscenesDataset"
This will create gt database without velocity. to add velocity, use dataset name NuscenesDatasetVelo.
- Modify config file
There is some path need to be configured in config file:
train_input_reader: {
  ...
  database_sampler {
    database_info_path: "/path/to/dataset_dbinfos_train.pkl"
    ...
  }
  dataset: {
    dataset_class_name: "DATASET_NAME"
    kitti_info_path: "/path/to/dataset_infos_train.pkl"
    kitti_root_path: "DATASET_ROOT"
  }
}
...
eval_input_reader: {
  ...
  dataset: {
    dataset_class_name: "DATASET_NAME"
    kitti_info_path: "/path/to/dataset_infos_val.pkl"
    kitti_root_path: "DATASET_ROOT"
  }
}
Usage
train
I recommend to use script.py to train and eval. see script.py for more details.
train with single GPU
python ./pytorch/train.py train --config_path=./configs/car.fhd.config --model_dir=/path/to/model_dir
train with multiple GPU (need test, I only have one GPU)
Assume you have 4 GPUs and want to train with 3 GPUs:
CUDA_VISIBLE_DEVICES=0,1,3 python ./pytorch/train.py train --config_path=./configs/car.fhd.config --model_dir=/path/to/model_dir --multi_gpu=True
Note: The batch_size and num_workers in config file is per-GPU, if you use multi-gpu, they will be multiplied by number of GPUs. Don't modify them manually.
You need to modify total step in config file. For example, 50 epochs = 15500 steps for car.lite.config and single GPU, if you use 4 GPUs, you need to divide steps and steps_per_eval by 4.
train with fp16 (mixed precision)
Modify config file, set enable_mixed_precision to true.
-
Make sure "/path/to/model_dir" doesn't exist if you want to train new model. A new directory will be created if the model_dir doesn't exist, otherwise will read checkpoints in it.
-
training process use batchsize=6 as default for 1080Ti, you need to reduce batchsize if your GPU has less memory.
-
Currently only support single GPU training, but train a model only needs 20 hours (165 epoch) in a single 1080Ti and only needs 50 epoch to reach 78.3 AP with super converge in car moderate 3D in Kitti validation dateset.
evaluate
python ./pytorch/train.py evaluate --config_path=./configs/car.fhd.config --model_dir=/path/to/model_dir --measure_time=True --batch_size=1
- detection result will saved as a result.pkl file in model_dir/eval_results/step_xxx or save as official KITTI label format if you use --pickle_result=False.
pretrained model
You can download pretrained models in google drive. The car_fhd model is corresponding to car.fhd.config.
Note that this pretrained model is trained before a bug of sparse convolution fixed, so the eval result may slightly worse.
Docker (Deprecated. I can't push docker due to network problem.)
You can use a prebuilt docker for testing:
docker pull scrin/second-pytorch
Then run:
nvidia-docker run -it --rm -v /media/yy/960evo/datasets/:/root/data -v $HOME/pretrained_models:/root/model --ipc=host second-pytorch:latest
python ./pytorch/train.py evaluate --config_path=./configs/car.config --model_dir=/root/model/car
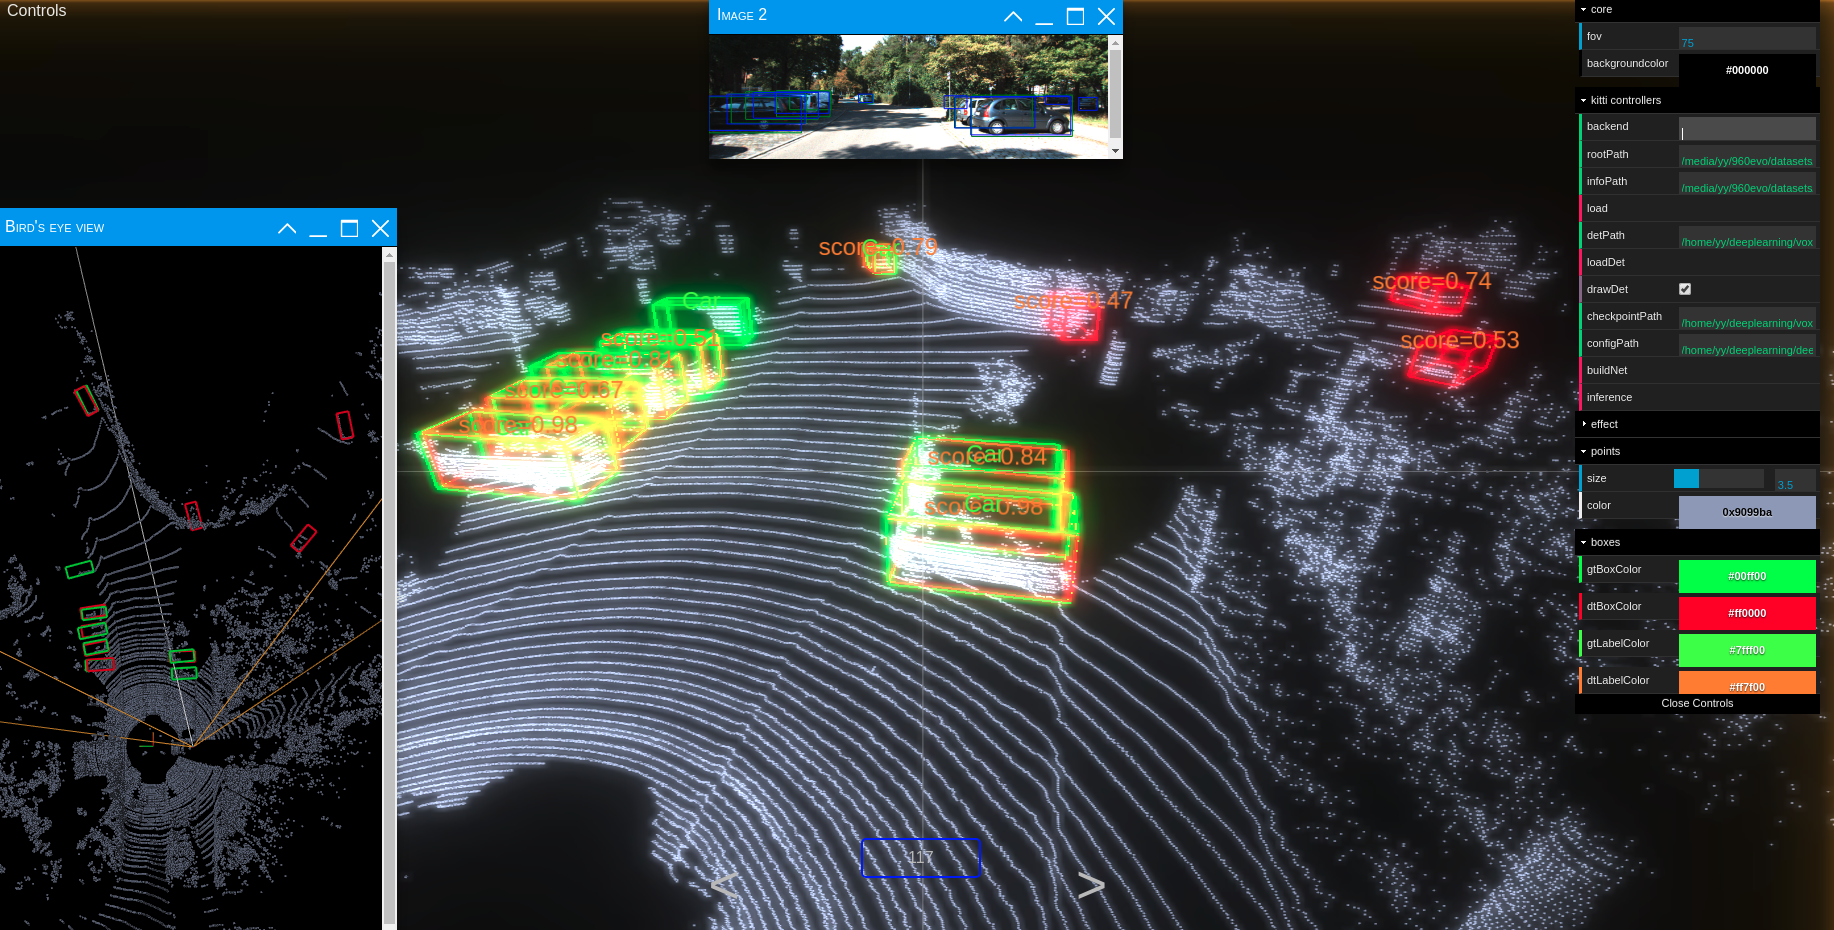
Try Kitti Viewer Web
Major step
-
run
python ./kittiviewer/backend/main.py main --port=xxxxin your server/local. -
run
cd ./kittiviewer/frontend && python -m http.serverto launch a local web server. -
open your browser and enter your frontend url (e.g. http://127.0.0.1:8000, default]).
-
input backend url (e.g. http://127.0.0.1:16666)
-
input root path, info path and det path (optional)
-
click load, loadDet (optional), input image index in center bottom of screen and press Enter.
Inference step
Firstly the load button must be clicked and load successfully.
-
input checkpointPath and configPath.
-
click buildNet.
-
click inference.
Try Kitti Viewer (Deprecated)
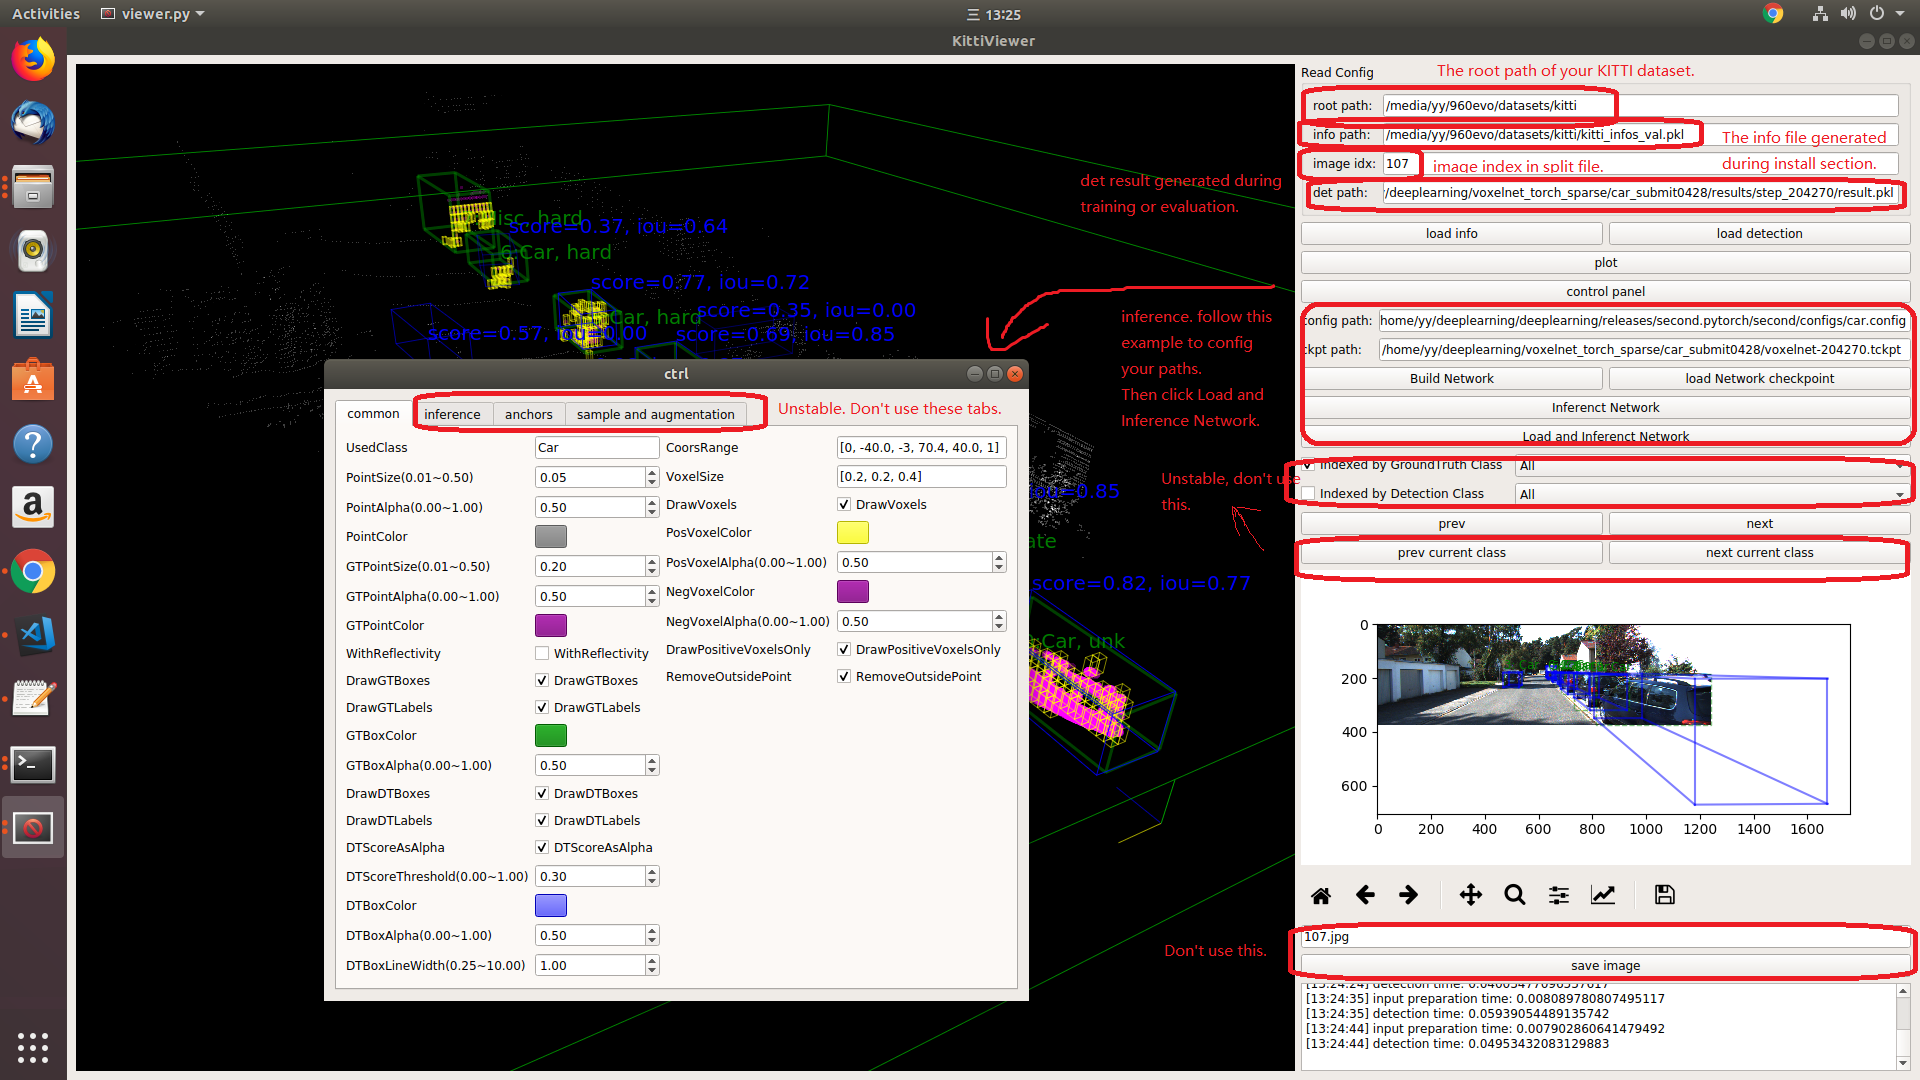
You should use kitti viewer based on pyqt and pyqtgraph to check data before training.
run python ./kittiviewer/viewer.py, check following picture to use kitti viewer:
Concepts
- Kitti lidar box
A kitti lidar box is consist of 7 elements: [x, y, z, w, l, h, rz], see figure.
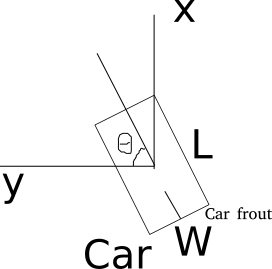
All training and inference code use kitti box format. So we need to convert other format to KITTI format before training.
- Kitti camera box
A kitti camera box is consist of 7 elements: [x, y, z, l, h, w, ry].