GroundX On-Prem/On-Cloud Kubernetes Infrastructure As Code
Table of Contents
- Command Line Tool Dependencies
- Cluster Requirements
- Installing Services
- Installing the GroundX Application
- Enabling Autoscaling (HPA)
- How Autoscaling Works
- Enabling the Custom Metrics Server
- Prometheus Integration (Optional)
- Using Simulated LLM Responses (Optional)
Terraform Deployment (terraform/aws/)
What is GroundX On-Prem?
With this repository you can deploy GroundX RAG document ingestion and search capabilities to a Kubernetes cluster in a manner that can be isolated from any external dependencies.
GroundX delivers a unique approach to advanced RAG that consists of three interlocking systems:
- GroundX Ingest: A state-of-the-art vision model trained on over 1M pages of enterprise documents. It delivers unparalleled document understanding and can be fine-tuned for your unique document sets.
- GroundX Store: Secure, encrypted storage for source files, semantic objects, and vectors, ensuring your data is always protected.
- GroundX Search: Built on OpenSearch, it combines text and vector search with a fine-tuned re-ranker model for precise, enterprise-grade results.
In head-to-head testing, GroundX significantly outperforms many popular RAG tools (ref1, ref2, ref3), especially with respect to complex documents at scale. GroundX is trusted by organizations like Air France, Dartmouth and Samsung with over 2 billion tokens ingested on our models.
GroundX On-Prem allows you to leverage GroundX within hardened and secure environments. GroundX On-Prem requires no external dependencies when running, meaning it can be used in air-gapped environments. Deployment consists of two key steps:
- (Optional) Creation of Infrastructure on AWS via Terraform
- Deployment of GroundX onto Kubernetes via Helm
Currently, creation of infrastructure via Terraform is only supported for AWS. However, with sufficient expertise GroundX can be deployed onto any pre-existing Kubernetes cluster.
This repo is in Open Beta. Feedback is appreciated and encouraged. To use the hosted version of GroundX visit EyeLevel.ai. For white glove support in configuring this open source repo in your environment, or to access more performant and closed source versions of this repo, contact us. To learn more about what GroundX is, and what it's useful for, you may be interested in the following resources:
- A Video discussion the importance of parsing, and a comparison of several approaches
- GroundX being used to power a multi-modal RAG application
- GroundX being used to power a verbal AI Agent
If you're deploying GroundX On-Prem on AWS, you might be interested in this simple video guide for deploying on AWS. To see how well GroundX understands your documents, check out our online testing tool:
 |
|---|
| Test your documents for free online |
GroundX Ingest Service
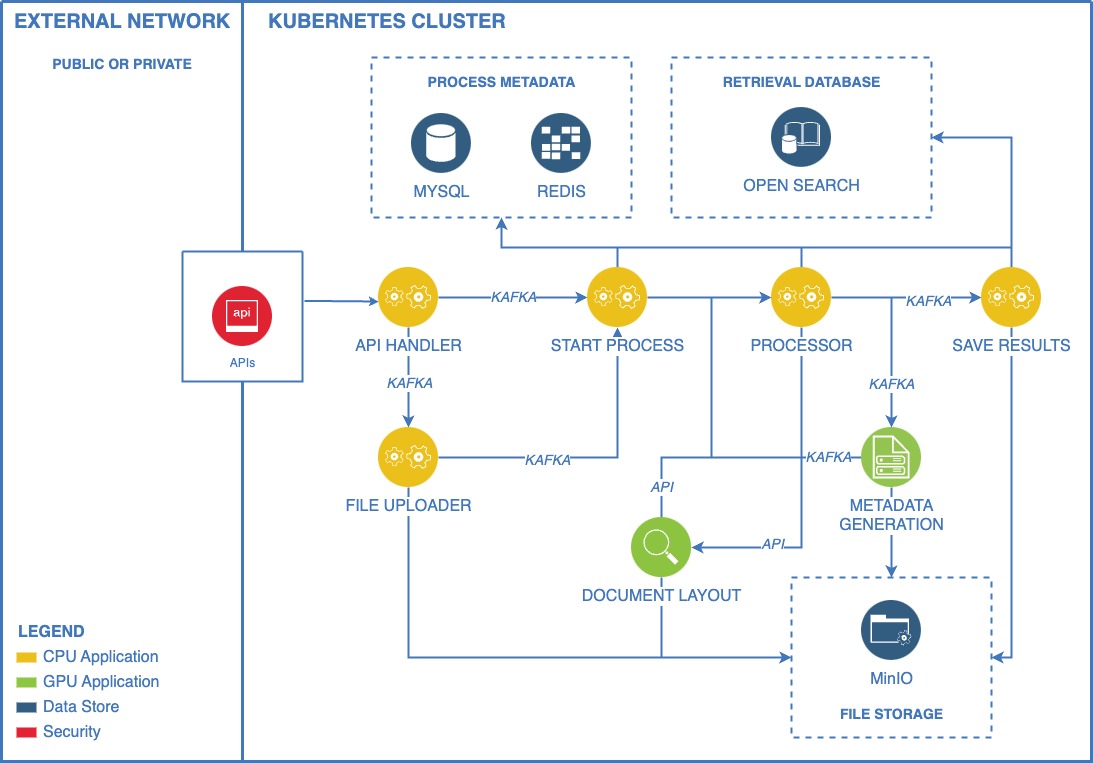
The GroundX ingest service expects visually complex documents in a variety of formats. It analyzes those documents with several fine tuned models, converts the documents into a queryable representation which is designed to be understood by LLMs, and stores that information for downstream search.
GroundX Search Service
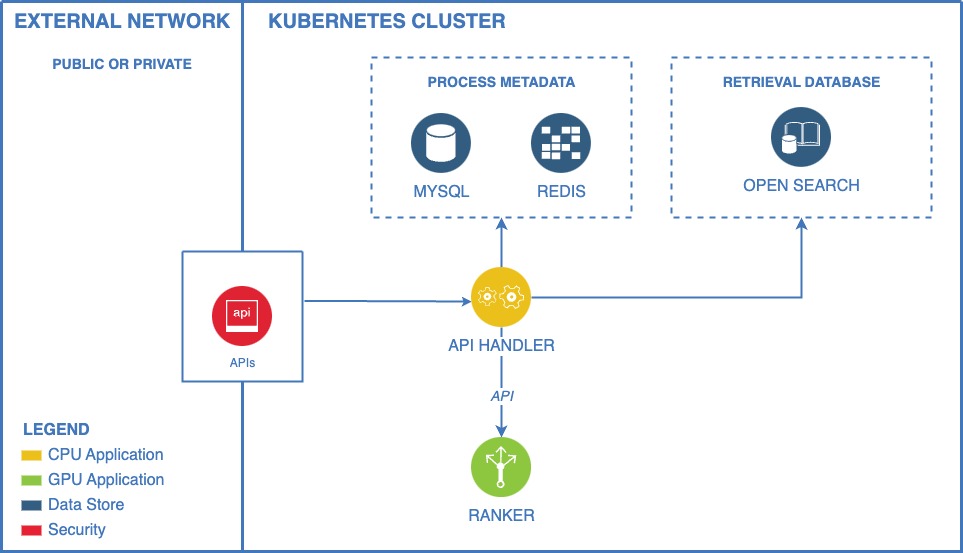
Once documents have been processed via the ingest service they can be queried against via natural language queries. We use a custom configuration of Open Search which has been designed in tandem with the representations generated from the ingest service.
Installing GroundX
Command Line Tool Dependencies
You must have the following command line tools installed:
- `bash` shell (version 4.0 or later recommended. AWS Cloud Shell has insufficient resources.)
- `kubectl` (or `oc`) configured to a namespace you can write to (e.g., `eyelevel`) ([Setup Docs](https://kubernetes.io/docs/tasks/tools/))
- `helm` v3.8+
Cluster Requirements
In order to deploy GroundX On-Prem to your Kubernetes cluster, you must:
- Check that you have the required compute resources
- Configure or create appropriate node groups and nodes
- Create a Namespace or use an existing one
- Create a PV Class or use an existing one
- Install the NVIDIA GPU Operator if it's not already installed
Background
Node Groups
By default, the GroundX On-Prem pods deploy to nodes using node selector labels and tolerations. Here is an example from one of the k8 yaml configs:
nodeSelector:
  eyelevel_node: "eyelevel-cpu-only"
tolerations:
  - key: "eyelevel_node"
    value: "eyelevel-cpu-only"
    effect: "NoSchedule"
Node labels are defined in the values.yaml and must be applied to appropriate nodes within your cluster. Default node label values are:
eyelevel-cpu-memory
eyelevel-cpu-only
eyelevel-gpu-layout
eyelevel-gpu-ranker
eyelevel-gpu-summary
Required Compute Resources
Chip Architecture
The publicly available GroundX On-Prem Kubernetes pods are all built for x86_64 architecture. Pods built for other architectures, such as arm64, are available upon customer request.
Supported GPUs
The GroundX On-Prem GPU pods are designed to run on NVIDIA GPUs with CUDA 12+. Other GPU types or older driver versions are not supported.
As part of the deployment, the NVIDIA GPU Operator must be installed. We offer terraform scripts to deploy the NVIDIA GPU Operator to your cluster, if you have not already done so.
The NVIDIA GPU operator should update your NVIDIA drivers and other software components needed to provision the GPU, so long as you have supported NVIDIA hardware on the machine.
Total Recommended Resources
The GroundX On-Prem recommended resource requirements are:
eyelevel-cpu-only
    80 GB     disk drive space
    8         CPU cores
    16 GB     RAM

eyelevel-cpu-memory
    20 GB     disk drive space
    4         CPU cores
    16 GB     RAM

eyelevel-gpu-layout
    16 GB     GPU memory
    75 GB     disk drive space
    4         CPU cores
    12 GB     RAM

eyelevel-gpu-ranker
    16 GB     GPU memory
    75 GB     disk drive space
    8         CPU cores
    30 GB     RAM

eyelevel-gpu-summary
    48 GB     GPU memory
    100 GB    disk drive space
    4         CPU cores
    30 GB     RAM
Node Group Resources
The GroundX On-Prem pods are grouped into 5 categories, based on resource requirements, and deploy as described in the node group section.
These pods can be deployed to 5 different dedicated node groups, a single node group, or any combination in between, so long as the minimum resource requirements are met and the appropriate node labels are applied to the nodes.
The resource requirements are as follows:
eyelevel-cpu-only
Pods in this node group have minimal requirements on CPU, RAM, and disk drive space. They can run on virtually any machine with the supported architecture.
The resource requirements for these pods are described in more detail in the Total Recommended Resources section above.
eyelevel-cpu-memory
Pods in this node group have a range of requirements on CPU, RAM, and disk drive space but can typically run on most machines with the supported architecture.
CPU and memory intensive ingestion pipeline pods, such as layout_ocr, layout_save, and pre_process, will deploy to the eyelevel-cpu-memory nodes. The layout_ocr pod includes tesseract, which benefits from access to multiple vCPU cores.
The resource requirements for these pods are described in more detail in the Total Recommended Resources section above.
eyelevel-gpu-layout
Pods in this node group have specific requirements on GPU, CPU, RAM, and disk drive space.
The resource requirements for these pods are described detail in more detail in the Total Recommended Resources section above.
The current configuration for this service assumes an NVIDIA GPU with 16 GB of GPU memory, 4 CPU cores, and at least 12 GB RAM. It deploys 1 pod with threads on this node (called layout.inference.threads in values.yaml) and claims the GPU via the nvidia.com/gpu resource provided by the NVIDIA GPU operator.
If your machine has different resources than this, you will need to modify layout.inference in your values.yaml using the per pod requirements described above to optimize for your node resources.
Note: in many cloud Kubernetes services, such as EKS, you must use a node image that supports GPUs (e.g. AL2023_x86_64_NVIDIA).
eyelevel-gpu-ranker
Pods in this node group have specific requirements on GPU, CPU, RAM, and disk drive space.
The resource requirements for these pods are described detail in more detail in the Total Recommended Resources section above.
The current configuration for this service assumes an NVIDIA GPU with 16 GB of GPU memory, 4 CPU cores, and at least 30 GB RAM. It deploys 1 pod with 14 workers on this node (called ranker.inference.workers in values.yaml). It does not claim the GPU via the nvidia.com/gpu resource provided by the NVIDIA GPU operator but uses 16 GB of GPU memory.
If your machine has different resources than this, you will need to modify ranker.inference in your values.yaml using the per pod requirements described above to optimize for your node resources.
Note: in many cloud Kubernetes services, such as EKS, you must use a node image that supports GPUs (e.g. AL2023_x86_64_NVIDIA).
eyelevel-gpu-summary
Pods in this node group have specific requirements on GPU, CPU, RAM, and disk drive space.
The resource requirements for these pods are described detail in more detail in the Total Recommended Resources section above.
The current configuration for this service assumes an NVIDIA GPU with 48 GB of GPU memory, 4 CPU cores, and at least 30 GB RAM. It deploys 1 pod on this node (called summary.inference.replicas.desired in values.yaml). It does not claim the GPU via the nvidia.com/gpu resource provided by the NVIDIA GPU operator but uses 24 GB of GPU memory per worker.
If your machine has different resources than this, you will need to modify summary.inference in your values.yaml using the per pod requirements described above to optimize for your node resources.
Note: in many cloud Kubernetes services, such as EKS, you must use a node image that supports GPUs (e.g. AL2023_x86_64_NVIDIA).
Configure Node Groups
As mentioned in the node groups section, node labels are defined in values.yaml and must be applied to appropriate nodes within your cluster. Default node label values include:
eyelevel-cpu-memory
eyelevel-cpu-only
eyelevel-gpu-layout
eyelevel-gpu-ranker
eyelevel-gpu-summary
Multiple node labels can be applied to the same node group, so long as resources are available as described in the total recommended resource and node group resources sections.
However, all node labels must exist on at least 1 node group within your cluster. The label should be applied with a string key named eyelevel_node and an enumerated string value from the list above.
Applying Custom Node Groups
Default Labels
If you use the default labels described in Configure Node Groups, you do not need to do anything else. The helm chart assumes these default values during the deployment.
Custom Labels
If you use custom labels, you must update the following values during GroundX deployment:
cache.node
cache.metrics.node
groundx.node
layout.api.node
layout.correct.node
layout.inference.node
layout.map.node
layout.ocr.node
layout.process.node
layout.save.node
layoutWebhook.node
preProcess.node
process.node
queue.node
ranker.api.node
ranker.inference.node
summary.api.node
summary.inference.node
summaryClient.node
upload.node
See the values.yaml README.md for more information about these values.
You will also need to update values for any services you deploy as well.
Namespace
You must have a namespace where the GroundX application can be installed. If you need to create one, you can do so by running the following command:
kubectl create namespace eyelevel
This will create a namespace called eyelevel where GroundX pods will be installed.
The default values.yaml namespace assumes a name of eyelevel. If you choose to use a different namespace name, you will have to update the values.yaml file accordingly.
PV Class
GroundX requires a PV class for some of the pods. If you have not created one, we have included a chart that will create one. You can run it with the following comand:
helm install groundx-storageclass \
  groundx/groundx-storageclass \
  -n eyelevel
NVIDIA GPU Operator
Some of the GroundX pods require access to an NVIDIA GPU. The easiest way to ensure access is to install the NVIDIA GPU Operator, which will ensure the appropriate drivers and libraries are installed on the GPU nodes.
If you'd like to install the NVIDIA GPU Operator to your cluster, use the following commands below:
helm repo add nvidia https://helm.ngc.nvidia.com/nvidia
helm repo update

helm install nvidia-gpu-operator \
  nvidia/gpu-operator \
  -n nvidia-gpu-operator \
  --create-namespace \
  --atomic \
  -f helm/values/nvidia/values.yaml
Installing in Microsoft Azure
If you're installing the NVIDIA GPU operator into Microsoft Azure, be sure to set the runtimeClass to nvidia-container-runtime. We have included an example yaml that shows how to do this at helm/values/nvidia/values.aks.yaml.
If you'd like to install the NVIDIA GPU Operator with this AKS-specific yaml, use the following commands below:
helm install nvidia-gpu-operator nvidia/gpu-operator \
  -n nvidia-gpu-operator \
  --create-namespace \
  --atomic \
  -f helm/values/nvidia/values.aks.yaml
Installing Services
Redis
Using an Existing Redis Cluster
If you wish to use an existing redis cache, you must configure the cache.existing and cache.metrics.existing parameters in your values.yaml.
Deploying a Dedicated Redis Cluster
If you'd like to install redis to your cluster, instances will be automatically created during the application installation for you so long as cache.existing is an empty dictionary and cache.enabled is true.
Workspace
The workspace service family is optional and disabled by default. Enable it when the Partner API should provision managed code projects for GroundX Studio Harness generated projects. The runner is internal-only: agents call the Partner API, the Partner API calls the runner, and the runner owns managed repository creation, short-lived git sessions, fallback file operations, command execution, cleanup, and publish operations.
Set workspace.enabled: true and provide either workspace.token or workspace.existingSecret. When workspace.token is provided, the chart renders it into the generated GroundX config.yaml as workspace.token, renders it into the runner config.py as runner_token, and creates a workspace-secret containing WORKSPACE_RUNNER_TOKEN as the environment fallback. When workspace.existingSecret is provided, that secret must contain WORKSPACE_RUNNER_TOKEN; both the Partner API and workspace runner fall back to that environment value because the config files intentionally render the token empty. The internal runner URL is derived into GroundX config.yaml as workspace.baseURL, not stored as a secret.
The runner follows the standard Python microservice deployment pattern. The API uses the shared Gunicorn deployment template and the workers use the shared supervisord Celery deployment template. Workspace-specific resources provide /app/config.py (a Secret, since it carries credentials — see GX-17), /app/gunicorn_conf.py (a ConfigMap), and one supervisord config per queue (ConfigMaps): provision, workspace, command, publish, and cleanup. API knobs such as threads, workers, timeout, timeoutKeepAlive, replicas, resources, node, serviceAccount, and pod metadata live under workspace.api, matching the other Python API services. Worker knobs such as queue, threads, workers, replicas, resources, node, serviceAccount, and pod metadata live under each worker section: provision, workspace, command, publish, and cleanup.
Workspace project metadata and operation state are stored in MySQL. The primary path creates a managed GitHub or GitLab repository from the scaffold, returns a short-lived repo-scoped git session, and expects agents to clone, edit, commit, and push locally. The optional secondary file API uses /tmp/workspaces only as a disposable checkout cache for server-side reads, writes, patches, commands, and diffs; Git remains the source of truth and cache loss is recoverable. By default the chart renders this cache as emptyDir. Set workspace.pvc.enabled: true only when you want a persistent cache for repeated secondary file API work. When enabled, the PVC follows the same helper pattern as inference services: cluster.pvClass sets the storage class and cluster.pvAccessMode sets the access mode. Prefer ReadWriteMany when multiple workspace pods need to share the cache. The runner waits on Redis/Valkey and MySQL but does not wait on file storage because workspace artifacts are not part of the GroundX document file store. Runtime config rendered into /app/config.py uses chart helpers for MySQL, Redis/Valkey, command, and workspace defaults, with workspace.publishDryRun exposed as the normal safety toggle.
workspace.ownershipChecksEnabled defaults to true. Setting it to false skips runner ownership comparisons and project-list filtering, but leaves runner authentication and operation safety checks active. The shared ConfigMap change rolls the workspace API and every worker. Deploy a compatible workspace-runner image before using a chart version that renders this setting. Restore true before offering Workspace outside internal use.
Publish is dry-run by default. To enable real publish, set workspace.publishDryRun: false, configure the provider credentials owned by the runner service, and set the workflow or pipeline to trigger. For GitHub Actions:
Managed project data is also disabled by default. For the hosted AWS path, set workspace.managedData.enabled: true, its AWS region, and the dev and prod S3 bucket, Redis endpoint, and Redis user-group values. To verify managed MySQL certificates with a public CA, set workspace.managedData.mysqlSslCaConfigMap to an existing ConfigMap containing the fixed key ca.pem; the chart mounts it read-only at /var/run/config/workspace/mysql/ca.pem in the Workspace API and all five workers. Use workspace.existingSecret; it must contain WORKSPACE_RUNNER_TOKEN, MANAGED_DATA_RDS_ADMIN_CONNECTION_DEV, and MANAGED_DATA_RDS_ADMIN_CONNECTION_PROD. Keep the RDS administrator URLs out of values files. Grant every Workspace component service account the least-privilege AWS permissions needed to manage the configured S3 prefixes, IAM users, and ElastiCache users. Enable dev first and verify allocation, republish, isolation, and confirmed deletion before enabling prod. Disabling the setting stops new reconciliation but does not delete existing app data.
workspace:
  enabled: true
  token: ""
  publishDryRun: false
  publishGithubWorkflowId: deploy.yml
  github:
    appId: ""
    installationId: ""
    privateKeySecret:
      name: workspace-github-app
      key: private-key.pem
For GitLab, set workspace.gitProvider: gitlab, configure workspace.gitlab.apiBaseUrl, and provide a token via workspace.gitlab.tokenSecret or workspace.gitlab.token.
privateKeySecret is the production path: the chart mounts that existing secret only into workspace API and worker pods at /var/run/secrets/workspace/github/private-key.pem. For local or lower-environment testing, workspace.github.privateKeyPem can populate GITHUB_APP_PRIVATE_KEY_PEM in a generated workspace-github-secret that is mounted only into workspace API and worker pods. GitHub credentials are not mounted into the Partner API service.
Workspace autoscaling uses the same external metrics server as the rest of GroundX. Enable the metrics server and either global or per-component HPA settings so every rendered HPA metric has a matching config.yaml metric definition:
metrics:
  enabled: true

cluster:
  hpa: true

workspace:
  enabled: true
  token: ""
  command:
    queue: command_queue
    replicas:
      desired: 2
      threshold: 10
      throughput: 1250
The API emits workspace-api:api with a default threshold of 4000 and, by default, workspace-api:throughput with a default throughput of 50000. The Partner API receives the runner URL from the workspace API helper, so the derived internal URL follows the same pattern as extract-api: http://workspace-api..svc.cluster.local. Worker HPAs emit workspace-:task and point the metrics server at the configured Celery queue for that worker; worker task thresholds default to 10, worker targets default to 1, and worker throughput defaults to 50000. All of these values may be overridden per worker. Keep custom worker queue names in values rather than editing templates so the HPA and metrics-server config stay in sync.
Run the local Helm production gate before changing chart helpers, values, schemas, or snapshots:
.build/bin/validate-helm.sh
The Helm CI gate uses the same script. It lints both chart surfaces, runs Helm unittest, verifies that snapshots did not silently drop empty renders, runs .build/bin/verify-workspace-chart.py to prove the workspace API service and metrics contracts stay aligned, and runs .build/bin/verify-storage-contract.py to prove StorageClass defaults, provider examples, PVC access modes, mirrored chart files, and the setup-eks generated EFS/EBS values and printed Helm commands all render. After deploying to a cluster, run .build/bin/smoke-workspace-runner.sh with the target kube context selected to verify the API, workers, cluster DNS, health endpoint, internal /storage status endpoint, and Partner API runner URL wiring.
MySQL
Using an Existing MySQL Cluster
If you wish to use an existing MySQL cluster, you must configure the db.existing parameters in your values.yaml.
Deploying a Dedicated MySQL Cluster
If you'd like to install MySQL to your cluster, use the following commands below:
helm repo add percona https://percona.github.io/percona-helm-charts/
helm repo update

helm install db-operator \
  percona/pxc-operator \
  -n eyelevel \
  -f helm/values/percona/values.operator.yaml
helm install db-cluster \
  percona/pxc-db \
  -n eyelevel \
  -f helm/values/percona/values.cluster.yaml
MinIO
Using an Existing MinIO Cluster
If you wish to use an existing MinIO cluster, you must configure the file.existing parameters in your values.yaml.
Using AWS S3
If you wish to use an existing AWS S3 bucket, you must configure the file.existing parameters in your values.yaml and set file.serviceType to s3.
Deploying a Dedicated MinIO Cluster
If you'd like to install MinIO to your cluster, use the following commands below:
helm repo add minio-operator https://operator.min.io/
helm repo update

helm install minio-operator \
  minio-operator/operator \
  -n eyelevel \
  -f helm/values/minio/values.operator.yaml
helm install minio-cluster \
  minio-operator/tenant \
  -n eyelevel \
  -f helm/values/minio/values.tenant.yaml
OpenSearch
Using an Existing OpenSearch Cluster
If you wish to use an existing OpenSearch cluster, you must configure the search.existing parameters in your values.yaml.
Deploying a Dedicated OpenSearch Cluster
If you'd like to install OpenSearch to your cluster, use the following commands below:
helm repo add opensearch https://opensearch-project.github.io/helm-charts/
helm repo update

helm install opensearch opensearch/opensearch -n eyelevel -f helm/values/opensearch/values.yaml
Kafka
Using an Existing Kafka Cluster
If you wish to use an existing Kafka cluster, you must configure the stream.existing parameters in your values.yaml.
Using AWS SQS
If you wish to use existing AWS SQS queues, you must configure the stream.existing parameters in your values.yaml and set stream.serviceType to sqs.
Deploying a Dedicated Kafka Cluster
If you'd like to install Kafka to your cluster, use the following commands below:
helm install stream-operator \
  oci://quay.io/strimzi-helm/strimzi-kafka-operator \
  -n eyelevel \
  -f helm/values/strimzi/values.yaml
Once the operator is ready, run the following command:
helm install groundx-kafka-cluster \
  groundx/groundx-strimzi-kafka-cluster \
  -n eyelevel
Installing the GroundX Application
Pre-Requisites
You must have completed the following steps before attempting to install the GroundX application:
- Configure Node Groups
- Create or select a Namespace
- Create or select a PV Class
- Install the NVIDIA GPU Operator
- Install Services
Configuration
Instructions on how to configure GroundX On-Prem can by found in the main README.md. A set of example configurations can be found at helm/values.
For a GroundX deployment with default settings:
- Copy
sample.values.yamlto something likevalues.yaml - We minimally suggest updating the following values:
groundxKey      # a valid GroundX API key, to be used to look up licensing information
admin.apiKey    # admin values are associated with
admin.username  # the admin account for your deployment
admin.email
admin.password
cluster.pvClass # an existing storage class
cluster.pvAccessMode # ReadWriteMany for shared filesystems, ReadWriteOnce for block/local storage
cluster.type    # type of Kubernetes cluster
Note: admin.apiKey and admin.username must be valid UUIDs. We provide a helper script to generate random UUIDs. You can run it using thefollowing command:
bin/uuid
Persistent Storage
Chart publication status: as of this writing, only groundx-storageclass 0.1.1 is published to
registry.groundx.ai/helm -- helm search repo and a plain helm install/helm upgrade with no
--version pin resolve to 0.1.1, which has no lookup-based upgrade-safety guard and does not
default parameters.encrypted to "true". The 0.1.2 behavior described in the upgrade note below
(encrypted-by-default EBS installs, existing-class preservation on upgrade) applies only once 0.1.2
is published; until then, pin --version 0.1.2 explicitly once it is available, and do not assume an
unpinned install already has these defaults.
GroundX uses one app-wide persistent storage abstraction. Set cluster.pvClass to the Kubernetes storage class name and cluster.pvAccessMode to the access mode that class supports. Services that need PVCs, including summary inference, ranker inference, layout inference, and workspace when workspace.pvc.enabled: true, inherit those values unless their local pvc block explicitly overrides them.
Prefer a shared filesystem class with ReadWriteMany when available:
cluster:
  pvClass: eyelevel-pv
  pvAccessMode: ReadWriteMany
Use this mode when multiple pods need to share a mounted cache or model/data volume. Workspace does not require this for the primary local-git workflow, but it is useful when the secondary file API cache is configured as a PVC. Example storage class values are included for common shared filesystems:
- EKS/EFS:
src/groundx/prereqs/storageclass/values.efs.example.yaml - AKS/Azure Files:
src/groundx/prereqs/storageclass/values.azure-files.example.yaml - GKE Filestore:
src/groundx/prereqs/storageclass/values.gke-filestore.example.yaml
When only block or local storage is available, use ReadWriteOnce:
cluster:
  pvClass: eyelevel-pv
  pvAccessMode: ReadWriteOnce
An EKS/EBS example is available at src/groundx/prereqs/storageclass/values.ebs.example.yaml. With ReadWriteOnce, any pod family sharing the same PVC must be scheduled in a compatible shape because the volume cannot be mounted freely across nodes.
For AWS EKS, terraform/aws/setup-eks generates src/groundx/prereqs/storageclass/values.aws.local.yaml and src/groundx/values.aws.local.yaml from Terraform outputs. Use STORAGE_DRIVER=efs for the shared EFS path or STORAGE_DRIVER=ebs for EBS. The generated Helm commands printed by the script do not require manually editing the EFS filesystem ID.
Upgrade note (EBS encryption default): starting with groundx-storageclass 0.1.2, a new EBS install (provisioner ebs.csi.aws.com, or the legacy in-tree kubernetes.io/aws-ebs) renders parameters.encrypted: "true" by default -- an operator opting out sets encrypted: "false" explicitly (unquoted false, null, and "" are equivalent opt-out spellings). An already-installed StorageClass is never changed by a real helm upgrade --install: the chart reads the live class via Helm's lookup function and, when the class already exists, renders its current live parameters verbatim instead of the chart's new defaults -- helm upgrade never attempts to change a StorageClass's parameters, which Kubernetes treats as immutable once the object is created. When the class exists and any supplied parameter (encrypted, kmsKeyId, type, or a provisioner-specific one) differs from the live class, the chart's install notes print one line naming each parameter that was not applied. This lookup guard only sees a live cluster: helm template, a client-side dry run, and GitOps renderers have no live cluster to query, so those flows always render the new-install defaults -- an operator managing an existing class that 0.1.1 created without an explicit encrypted value must set encrypted: "false" explicitly to keep it unchanged. This does not work for a class that 0.1.1 created with an explicit encrypted: "false": 0.1.2 never renders an explicit false, so a no-live-cluster render omits the key, the rendered class then differs from the live one, and the apply fails on an immutable parameter. For that class, use a live-cluster helm upgrade --install (the lookup keeps the live value), stay on 0.1.1 in that flow, or create a new StorageClass. Changing an existing class's actual encryption requires creating a new StorageClass, because parameters cannot be updated in place. Pin the version explicitly (helm install groundx-storageclass groundx/groundx-storageclass --version 0.1.2 ...) once 0.1.2 is published -- an unpinned install resolves to whatever helm search repo currently reports (see the chart publication status note above), which may still be 0.1.1 and carries none of this behavior.
Helm Installation
When deploying from this checkout with an environment-specific values file, use the local source chart:
helm upgrade --install groundx src/groundx -n eyelevel -f values.ranker-only-eks.yaml
Replace values.ranker-only-eks.yaml with the values file for your target cluster. Do not set image
tags manually for a normal release; workloads that do not override their image tag use the chart
appVersion from src/groundx/Chart.yaml.
To install GroundX, add the chart repo to helm by running the following commands:
helm repo add groundx https://registry.groundx.ai/helm
helm repo update
Once the repo is added, you can install the GroundX application by running the following command:
helm install groundx \
  groundx/groundx \
  -n eyelevel \
  -f values.yaml
Replace values.yaml with the path to the values.yaml file you created in the previous Configuration step.
Autoscaling & Monitoring
GroundX includes built-in Horizontal Pod Autoscaling (HPA) and an optional custom metrics server.
Autoscaling is workload-aware: pods scale on pipeline throughput plus one additional metric (latency/backlog/throughput) depending on pod type.
Enabling Autoscaling (HPA)
HPA can be globally enabled for all supported pods:
cluster:
  hpa: true
If cluster.hpa is false, pods run with fixed replica counts.
Per-Pod HPA Control
You can enable or disable HPA per pod:
groundx:
  replicas:
    hpa: true
If HPA is disabled for a pod:
POD.replicas.desired
controls the replica count.
If HPA is enabled for a pod:
POD.replicas.min
POD.replicas.max
control the scaling bounds.
How Autoscaling Works
Every autoscaled pod scales on two metrics:
-
Pipeline throughput (all pods)
- The system estimates total pipeline throughput for files moving through GroundX.
- Each pod defines the throughput a single replica can support.
- Replicas increase until total pod capacity meets the estimated pipeline throughput.
-
Pod-specific metric (by pod type)
- api: response latency (default target 4s)
- queue: message backlog (default target 10)
- task: Celery task backlog (default target 10)
- inference: model request throughput (scales when requests exceed per-replica capacity)
For GPU inference, HPA scale-up also depends on node readiness. If each inference pod uses a full GPU node, every additional replica needs both a new pod and a new GPU node before it can absorb traffic.
Enabling the Custom Metrics Server
The custom metrics server exposes:
- Pipeline throughput
- API latency
- Queue backlog
- Task backlog
- Inference request throughput
Enable it with:
metrics:
  enabled: true
Prometheus Integration (Optional)
If using Prometheus Operator, enable the ServiceMonitor:
metrics:
  serviceMonitor:
    enabled: true
This allows Prometheus to automatically scrape the GroundX metrics endpoints.
For detailed monitoring setup, see the dedicated Monitoring README.
Using Simulated LLM Responses (Optional)
To run the system without calling OpenAI or self-hosted LLMs (useful for load testing or autoscaling validation), configure:
engines:
  default:
    engineId: test-model

extract:
  agent:
    modelId: test-model
When set, pods use simulated LLM responses instead of external model providers.
Terminal Extract Diagnostics
Terminal extract diagnostics are disabled by default. Enable the same value on the extract API, agent, download, and save pods with:
extract:
  terminalAgentTraceEnabled: true
Override one pod by setting extract.api.terminalAgentTraceEnabled,
extract.agent.terminalAgentTraceEnabled,
extract.download.terminalAgentTraceEnabled, or
extract.save.terminalAgentTraceEnabled. An explicit pod value wins over the
shared value, including false.
Use this only with an Internal Arcadia image that implements the AGE-272 terminal diagnostics contract. The runtime keeps successful work unchanged, publishes Celery failure callbacks before terminal persistence, and applies the rollout's storage, access, lifecycle, and failure-budget gates.
Using GroundX On-Prem
Get the API Endpoint
Once the setup is complete, run:
kubectl -n eyelevel get svc groundx
The API endpoint will be the external IP associated with the GroundX load balancer.
For instance, the "external IP" might resemble the following:
EXTERNAL-IP
xxxxxxxxxxxxxxxxxxxxxxxxxxxxxxxx-xxxxxxxxxx.us-east-2.elb.amazonaws.com
Use the SDKs
The API endpoint, in conjuction with the admin.api_key defined during deployment, can be used to configure the GroundX SDK to communicate with your On-Prem instance of GroundX.
Note: you must append /api to your API endpoint in the SDK configuration.
from groundx import GroundX

external_ip = 'xxxxxxxxxxxxxxxxxxxxxxxxxxxxxxxx-xxxxxxxxxx.us-east-2.elb.amazonaws.com'
api_key="xxxxxxxx-xxxx-xxxx-xxxx-xxxxxxxxxxxx"

client = GroundX(api_key=api_key, base_url=f"http://{external_ip}/api")
import { GroundXClient } from "groundx";

const external_ip = 'xxxxxxxxxxxxxxxxxxxxxxxxxxxxxxxx-xxxxxxxxxx.us-east-2.elb.amazonaws.com'

const groundx = new GroundXClient({
  apiKey: "xxxxxxxx-xxxx-xxxx-xxxx-xxxxxxxxxxxx",
  environment: `http://${external_ip}/api`;,
});
Use the APIs
The API endpoint, in conjuction with the admin.api_key defined during deployment, can be used to interact with your On-Prem instance of GroundX.
All of the methods and operations described in the GroundX documentation are supported with your On-Prem instance of GroundX. You simply have to substitute https://api.groundx.ai with your API endpoint.
Terraform Deployment (terraform/aws/)
terraform/aws/ is an optional path for provisioning AWS infrastructure (a VPC and/or an EKS
cluster) ahead of the Helm install described above — see Deployment
step 1. It is also the supported path for maintaining AWS infrastructure already provisioned
through it. As of November 4, 2025, the previous hybrid terraform-helm approach to deploying the
GroundX application itself was retired in favor of a pure Helm release; that change is about how
the application is installed onto a cluster, not about Terraform's role in provisioning the
cluster, which is unaffected and remains supported for both new and existing AWS installs.
Accessing Legacy Scripts
If you would like to access the legacy terraform scripts, they can be pulled from legacy-terraform-deployment.
EKS CPU and monitoring cost controls
CPU-only nodes default to gp3 disks and one unavailable node per update. CloudWatch keeps enhanced Container Insights enabled and Application Signals disabled. See EKS cost controls before applying these settings to an existing cluster.
Optional EKS Node Diagnostics
AWS EKS deployments managed by the bundled Terraform (new or existing) can enable default-off diagnostics with one setting. See EKS Node Diagnostics.
EKS Cluster Version Configuration
terraform/aws/variables.tf's environment_internal.eks_version key controls the Kubernetes
version requested for a new EKS cluster (via terraform/aws/eks/eks.tf's
module "eyelevel_eks".cluster_version). Leaving the key unset (the default) passes null to
the module, so AWS creates the cluster at the AWS default version rather than a version this repo
selects — see the EKS CreateCluster API
reference for what
"the AWS default version" means; it is not necessarily the newest version EKS offers.
Owner and bump process. The declared default in terraform/aws/env.tfvars.example (currently
1.35) is owned by whoever maintains groundx-on-prem. Bump it when the currently-declared
version approaches the end of its AWS EKS standard support
window, so new
installs land on a version still inside standard support.
What happens when standard support ends. This module does not set an EKS upgrade
policy, so the
outcome depends on the policy the cluster ends up with (AWS's own default for newly created
clusters is EXTENDED; an existing cluster this Terraform now maintains may already carry a
different policy set outside this repo):
EXTENDED— the cluster keeps running its current version past standard support, at an additional per-cluster hourly cost (EKS pricing), until it reaches its extended-support end date.STANDARD— there is no paid extended-support period; AWS force-upgrades the cluster to the next supported version once standard support ends, whether or not that upgrade was planned.
Know which policy your cluster has (aws eks describe-cluster --name --query cluster.upgradePolicy) so you know which of these two outcomes to expect, and budget for it.
Adopting the key on an existing cluster. setup-eks writes the key automatically: it reads
Terraform state (terraform show -json) to find an existing cluster, then looks up that cluster's
actual running version via aws eks describe-cluster — the declared default is only used when
state shows no cluster at all. If a cluster is found in state but its running version cannot be
resolved (bad credentials, missing IAM permission, wrong region, throttling), setup-eks aborts
rather than silently falling back to the declared default and risking an unattended downgrade — a
normal re-run is safe, an unresolvable one stops instead of guessing. An operator hand-editing
env.tfvars for an existing cluster must instead:
- Read the cluster's actual running version first:
aws eks describe-cluster --name --query cluster.version --output text. EKS does not support control-plane downgrades, so setting a lower version than what is running is rejected. - Know that this same value also drives every EKS-managed node group's AMI release selection
(
groundx-on-prem's node groups don't override it, so they inherit the cluster's resolved version) — changing it can trigger a managed-node-group rollout, not just a control-plane change. - Review
terraform -chdir=terraform/aws/eks planbefore applying.bin/environment ekscallsterraform apply --auto-approvewith no confirmation gate, so the plan output is the only review point before a version change takes effect.