⚠️ Project Status: Deprecated
Starmoon is no longer actively maintained. If you're looking to run realtime, multimodal voice AI on ESP32 and local devices, this work has continued under:
👉 ElatoAI: https://github.com/akdeb/ElatoAI
ElatoAI builds on many of the ideas explored in Starmoon, with improved WiFi and 2-way voice AI audio reliability, global availability, and production-ready architecture.
 Starmoon - A fully open-source, compact, conversational AI device to chat with custom AI characters
Starmoon is an affordable, compact AI-enabled device, you can take anywhere and converse with. It can understand your emotions and respond with empathy, offering supportive conversations and personalized learning assistance.


Highlights 🎥
Video Demo
https://github.com/user-attachments/assets/99a45810-0322-4945-b363-716e75d1c4dd
If you can't see the video, you can watch it here
Custom AI characters

Trends Dashboard

Key features 🎯
- Cost-effective: Assemble the device yourself with affordable off-the-shelf components.
- Voice-enabled emotional intelligence: Understand and analyze insights in your emotions through your conversations in real time.
- Open-source: Fully open-source, you can deploy Starmoon locally and self-host to ensure the privacy of your data.
- Compact device: Only slightly larger than an Apple Watch, you can carry the device anywhere.
- Reduced screen time: A myriad of AI companions are screen-based, and our intention is to give your eyes a rest.
Getting Started 🚀
Prerequisites 📋
-
Software:
- Vscode and PlatformIO plugin: For firmware burning
- Starmoon API key: Login to Starmoon and go to settings page to get your API key
- Clone the repository:
git clone https://github.com/StarmoonAI/Starmoon.git
-
Hardware list (Tax and shipping rates may vary by region)
- Seeed Studio Xiao ESP32S3 (or any other ESP32-S3 board)
- Microphone (INMP441)
- Amplifier (MAX98357A)
- Speaker (3525) (or any compatible microspeaker)
- LED light (RGB LED recommended)
- Button
- PCB prototype board or custom PCB
- 3D printed case
- Tools: 28AWG wires + soldering toolset + flux
Hardware setup 🧰
- Step 0: Follow the below Pin Configuration to set up the the ESP32 device
| Component | Seeed Studio XIAO ESP32S3 | ESP32-S3 |
|---|---|---|
| I2S Input (Microphone) | ||
| SD | D0 | GPIO 14 |
| WS | D1 | GPIO 1 |
| SCK | D2 | GPIO 4 |
| I2S Output (Speaker) | ||
| WS | D5 | GPIO 5 |
| BCK | D6 | GPIO 6 |
| DATA | D4 | GPIO 7 |
| SD (shutdown) | D3 | N/A |
| Others | ||
| LED Red | D7 | GPIO 9 |
| LED Green | D8 | GPIO 8 |
| LED Blue | D9 | GPIO 13 |
| Button | D10 | GPIO 2 |
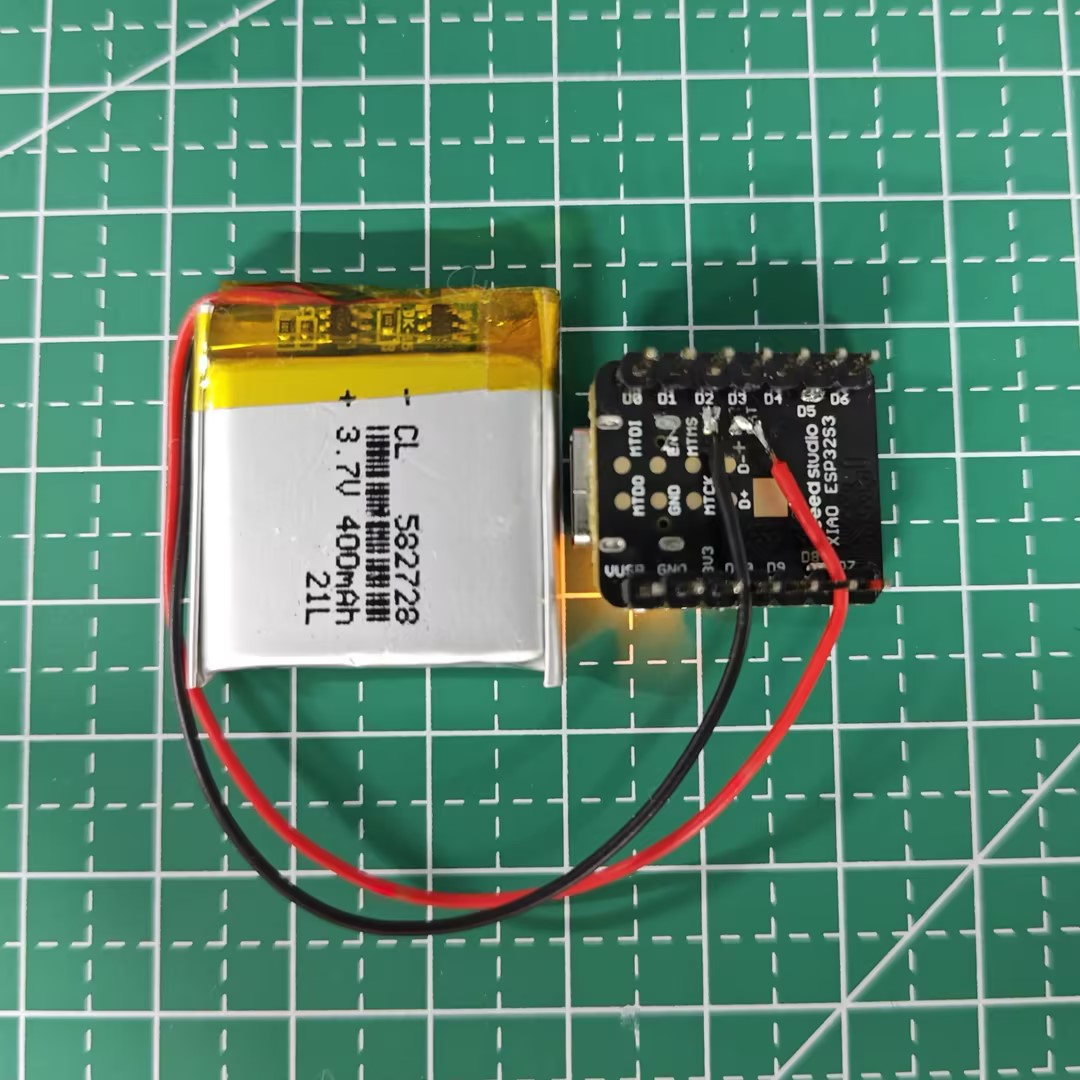
If you are using the Seeed Studio XIAO ESP32S3, then you can directly connect the lithium battery to the back of the ESP32.
-
Step 1: If you use normal ESP32-S3 chip, otherwise you can skip this step:
-
please go to Config.h and uncomment the
USE_NORMAL_ESP32_S3line and comment theUSE_XIAO_ESP32_DEVKITline.// ----------------- Pin Definitions ----------------- // Define which board you are using (uncomment one) #define USE_NORMAL_ESP32_S3 // #define USE_XIAO_ESP32_DEVKIT // #define USE_XIAO_ESP32 // #define USE_NORMAL_ESP32 // #define USE_ESP32_S3_WHITE_CASE -
Then, go to platformio.ini and uncomment the
[env:esp32-s3-devkitm-1]block and comment the[env:seeed_xiao_esp32s3]line.; [env:seeed_xiao_esp32s3] ; platform = espressif32 ; board = seeed_xiao_esp32s3 ; framework = arduino ; monitor_speed = 115200 [env:esp32-s3-devkitm-1] platform = espressif32 board = esp32-s3-devkitm-1 framework = arduino monitor_speed = 115200
-
-
Step 2: Click PlatformIO Icon in VScode left sidebar
- Click "Pick a folder"
- Select the location of the
firmwarefolder in the current project.
-
Step 3: Build the firmware
- Click
Buildbutton in the PlatformIO toolbar or run the build task.
- Click
-
Step 4: Upload the firmware to the device
- Connect your ESP32-S3 to your computer using usb.
- Click the
Uploadbutton to run the upload task, orUpload and Monitorbutton to run the upload task and monitor the device.
-
Step 5: Hardware usage
-
Turn on the device by main button and wait for the LED to turn on.
-
Use your phone/tablet/pc to connect "Starmoon-xxx" WiFi and follow the instructions to set up internet connection (only support 2.4Ghz WiFi).
- Connect the wifi by your credentials
- Use your Starmoon API key and email to set up the device
-
License
This project is licensed under the GPL-3.0 License - see the LICENSE file for details