Sparse Voxels Rasterizer
Project page | Arxiv | jupyter notebooks
Paper abstract
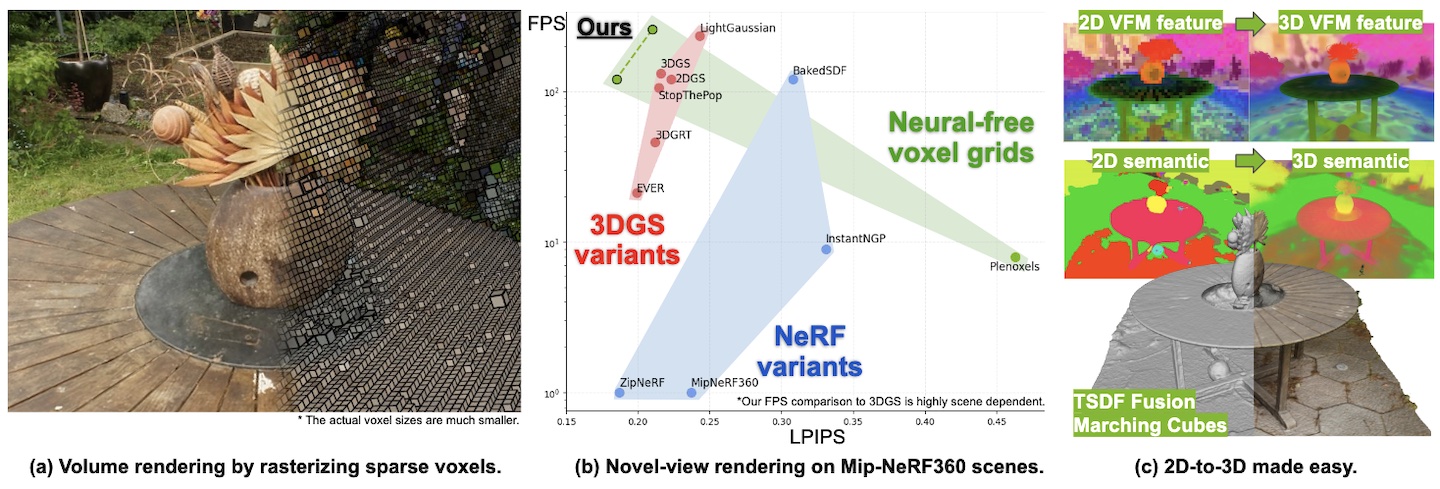
We propose an efficient radiance field rendering algorithm that incorporates a rasterization process on adaptive sparse voxels without neural networks or 3D Gaussians. There are two key contributions coupled with the proposed system. The first is to adaptively and explicitly allocate sparse voxels to different levels of detail within scenes, faithfully reproducing scene details with 65536^3 grid resolution while achieving high rendering frame rates. Second, we customize a rasterizer for efficient adaptive sparse voxels rendering. We render voxels in the correct depth order by using ray direction-dependent Morton ordering, which avoids the well-known popping artifact found in Gaussian splatting. Our method improves the previous neural-free voxel model by over 4db PSNR and more than 10x FPS speedup, achieving state-of-the-art comparable novel-view synthesis results. Additionally, our voxel representation is seamlessly compatible with grid-based 3D processing techniques such as Volume Fusion, Voxel Pooling, and Marching Cubes, enabling a wide range of future extensions and applications.
Updates:
- Jun 6, 2025: Major code refactoring. Add document to create model from voxels or points in a differentiable way.
- Mar 18, 2025: Revise literature review. Support depthanythingv2 relative depth loss and mast3r metric depth loss for a better geometry.
- Mar 8, 2025: Support ScanNet++ dataset. Check the benchmark for our results on the 3rd-party hidden set evaluation. Our short article may be helpful if you want to work on scannet or indoor environement.
Install
- Install Pytorch first. The tested versions are
1.13.1+cu117and2.5.0+cu124. - May need to install cuda-toolkit for your virtual environment that is aligned with the installed pytorch:
conda install -y -c "nvidia/label/cuda-11.7.0" cuda-toolkitconda install -y -c "nvidia/label/cuda-12.4.0" cuda-toolkit
pip install -r requirements.txtfor other packages.pip install -e cuda/for sparse voxel CUDA rasterizer and some utilities.
Reconstructing your own capture
Below go through the workflow for reconstruction from a scene capturing. Check example.ipynb for an actual example.
Data preparation
We recommend to follow InstantNGP video or images processing steps to extract camera parameters using COLMAP. NerfStudio also works.
We now only support pinhole camera mode. Please preprocess with --colmap_camera_model PINHOLE of InstantNGP script or --camera-type pinhole of NerfStudio script.
Scene optimization
python train.py --eval --source_path $DATA_PATH --model_path $OUTPUT_PATH
All the results will be saved into the specified $OUTPUT_PATH including the following results:
config.yaml: The config file for reproduction.pg_view/: Visualization of the training progress. Useful for debugging.test_stat/: Some statistic during the training.test_view/: Some visualization during the training.
The configuration is defined by the following three, the later overwrites the former.
src/config.py: Define the configuable setup and their initial values.--cfg_files: Sepcify a list of config files, the later overwrites the former. Some examples are undercfg/.- command line: Any field defined in
src/config.pycan be overwritten through command line. For instances:--data_device cpu,--subdivide_save_gpu.
Like InstantNGP and other NeRF variants, defining a proper main scene bounding box is crucial to quality and processing time. Note that the main scene bound is defined for the main 3D region of interest. There are another --outside_level (default 5) Octree levels for the background region. The default main scene bound heuristic may work well in many cases but you can manually tweak them for a better results or covering new type of capturing trajectory:
--bound_mode:default- Use the suggested bbox if given by dataset. Otherwise, it automatically chose from
forwardorcamera_medianmodes.
- Use the suggested bbox if given by dataset. Otherwise, it automatically chose from
camera_median- Set camera centroid as world origin. The bbox radius is set to the median distance between origin and cameras.
camera_max- Set camera centroid as world origin. The bbox radius is set to the maximum distance between origin and cameras.
forward- Assume LLFF forward-facing capturing. See
src/utils/bounding_utils.pyfor detail heuristic.
- Assume LLFF forward-facing capturing. See
pcd- Use COLMAP sparse points to compute a scene bound. See
src/utils/bounding_utils.pyfor detail heuristic.
- Use COLMAP sparse points to compute a scene bound. See
--bound_scale: scaling the main scene bound (default 1).
For scenes with background masked out, use --white_background or --black_background to specify the background color.
Other hyperparameter suggestions:
- Ray termination
--lambda_T_inside 0.01to encourage rays to stop inside the Octree. Useful for real-world scenes.--lambda_T_concen 0.1to encourage transmittance to be either 0 or 1. Useful for scenes whose background pixels are set to white or black. Remember to set either--white_backgroundor--black_backgroundin this case.
- Geometry
--lambda_normal_dmean 0.001 --lambda_normal_dmed 0.001to encourage self-consistency between rendered depth and normal.- Also cite 2dgs if you use this in your research.
--lambda_ascending 0.01to encourage density to be increasing along ray direction.--lambda_sparse_depth 0.01to use COLMAP sparse points loss to guide rendered depth.- Also cite dsnerf if you use this in your research.
--lambda_depthanythingv2 0.1to use depthanythingv2 loss to guide rendered depth.- It uses the huggingface version.
- It automatically saves the estimated depth map at the first time you activate this loss for the scene.
- Also cite depthanythingv2 and midas if you use this in your research.
--lambda_mast3r_metric_depth 0.1to use the metric depth derived from MASt3R to guide the rendered depth.
--save_quantizedto apply 8 bits quantization to the saved checkpoints. It typically reduce ~70% model size with minor quality difference.
Measuring FPS
python render.py $OUTPUT_PATH --eval_fps
Rendering views
- Rendering full training views:
python render.py $OUTPUT_PATH --skip_test --rgb_only --use_jpg
- Rendering testing views and evaluating results:
- It only works when training with
--eval. python render.py $OUTPUT_PATH --skip_trainpython eval.py $OUTPUT_PATH
- It only works when training with
- Render fly-through video:
python render_fly_through.py $OUTPUT_PATH
Interactive viewer
python viz.py $OUTPUT_PATH
You can then navigate the trained scenes using a web browser. Another interactive viewer is in example jupyter notebook using Kaolin. The FPS of the visualizer is bottleneck by streaming images via network protocal, especially when the it runs on remote server.
https://github.com/user-attachments/assets/44f1737a-c4d3-416d-bdf1-da8b3ecad57b
WebGL is now supported. Thanks samuelm2 for implementing the svraster-webgl viewer.
Meshing
Remember to train with --lambda_normal_dmean 0.001 --lambda_normal_dmed 0.001 to get a better geometry. Using sparse depth from COLMAP may also help --lambda_sparse_depth 0.01. After the scene optimization completed, run:
python extract_mesh.py $OUTPUT_PATH
Fusing 2D modality
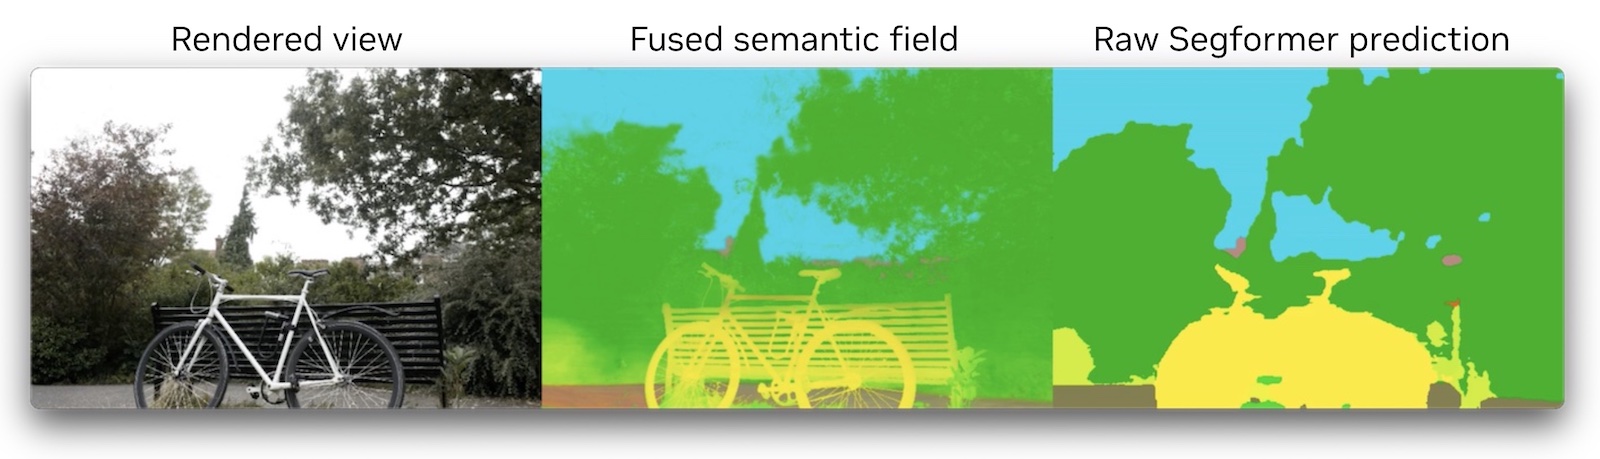
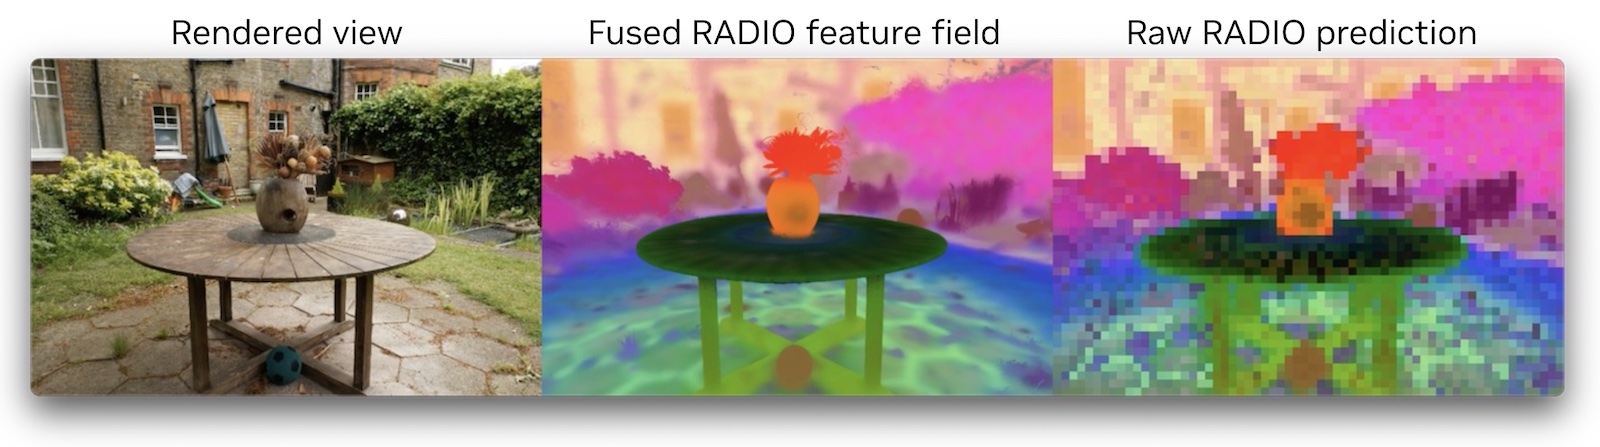
We can fuse 2D vision foundation feature or sementic segmentation results into voxels easily and instantly. The fusion can naturally smooth out the multi-view inconsistent predictions. More video results are in the project page.
- demo_segformer.ipynb
- We run Segformer to estimate 2D semantic segmentation for all the training views and fuse the 2D semantic into 3D sparse voxel field.
- demo_vfm_radio.ipynb
- We do Voxel Pooling first as RADIOv2.5 feature is high-dimensional (768 dim). The fusion step is the same as for Segformer.
- The final fields are a coarser vision foundation model feature field and a density field in original high-resolution.
Documents
- Check model_creation_tutor for a tutorial on various ways to create a model instance.
- Check model_functions for the properties and functions of a model instances.
Experiments on public dataset
Note: Be sure to double check the following two experimental details which has non-trivial impact to the quantitative results.
- Ground-truth downsampling: Results from (1) the internal downsampling
--res_downscaleand (2) the preprocessed down-sampled images specified by--image_dir_nameare very different. We follow the original 3DGS to use--image_dir_name. - LPIPS input scale: We follow the original 3DGS to use RGB in range of [0, 1] as default. The correct implementation should be in [-1, 1] which is reported as the corrected LPIPS by
eval.py.
Download the 3rd-party processed datasets
- Novel-view synthesis
- Mip-NeRF360 dataset
- T&T and DeepBlending dataset
- Synthetic NeRF dataset
- Scannet++ dataset
- Check scripts/scannetpp_preproc.py for pre-processing.
- Mesh reconstruction
- DTU dataset
- Check scripts/dtu_preproc.py for pre-processing.
- Tanks&Temples dataset
- DTU dataset
Running base setup
exp_dir="baseline"
other_cmd_args=""

# Run training
./scripts/mipnerf360_run.sh     output/mipnerf360/baseline     $other_cmd_args
./scripts/synthetic_nerf_run.sh output/synthetic_nerf/baseline $other_cmd_args
./scripts/tandt_db_run.sh       output/tandt_db/baseline       $other_cmd_args
./scripts/dtu_run.sh            output/dtu/baseline            $other_cmd_args
./scripts/tnt_run.sh            output/tnt/baseline            $other_cmd_args

# Summarize results
python scripts/mipnerf360_stat.py     output/mipnerf360/baseline
python scripts/synthetic_nerf_stat.py output/synthetic_nerf/baseline
python scripts/tandt_db_stat.py       output/tandt_db/baseline
python scripts/dtu_stat.py            output/dtu/baseline
python scripts/tnt_stat.py            output/tnt/baseline
Acknowledgement
Our code is originally developed on the amazing open-source codebase: gaussian-splatting and diff-gaussian-rasterization. The codebase has been very different now.
If you find our work useful in your research, please be so kind to give us a star and citing our paper.
@inproceedings{svraster,
  author       = {Cheng Sun and
                  Jaesung Choe and
                  Charles Loop and
                  Wei{-}Chiu Ma and
                  Yu{-}Chiang Frank Wang},
  title        = {Sparse Voxels Rasterization: Real-time High-fidelity Radiance Field
                  Rendering},
  booktitle    = {{CVPR}},
  year         = {2025},
}