Just image Transformer (JiT) for Pixel-space Diffusion


This is a PyTorch/GPU re-implementation of the paper Back to Basics: Let Denoising Generative Models Denoise:
@article{li2025jit,
  title={Back to Basics: Let Denoising Generative Models Denoise},
  author={Li, Tianhong and He, Kaiming},
  journal={arXiv preprint arXiv:2511.13720},
  year={2025}
}
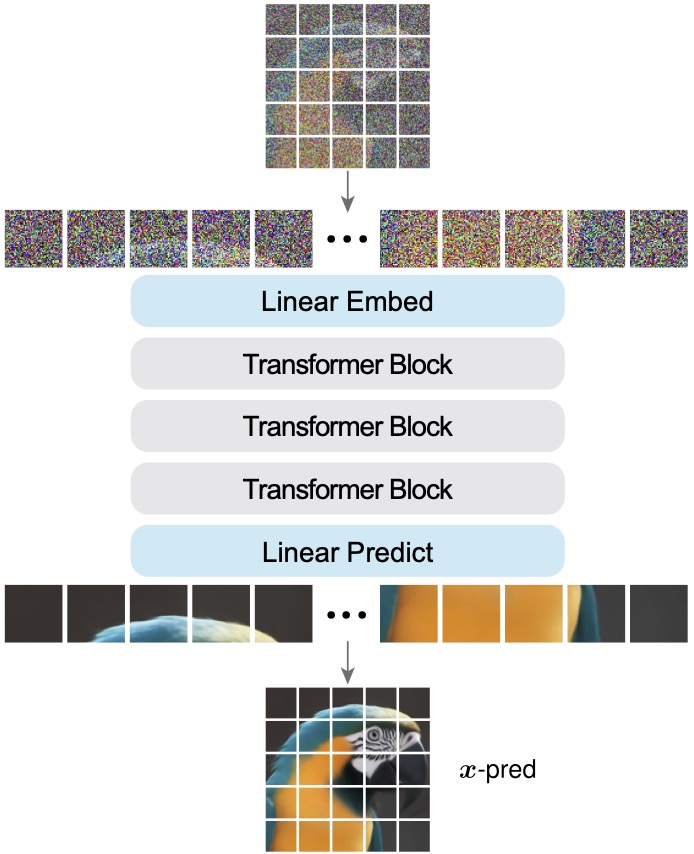
JiT adopts a minimalist and self-contained design for pixel-level high-resolution image diffusion. The original implementation was in JAX+TPU. This re-implementation is in PyTorch+GPU.
Dataset
Download ImageNet dataset, and place it in your IMAGENET_PATH.
Installation
Download the code:
git clone https://github.com/LTH14/JiT.git
cd JiT
A suitable conda environment named jit can be created and activated with:
conda env create -f environment.yaml
conda activate jit
If you get undefined symbol: iJIT_NotifyEvent when importing torch, simply
pip uninstall torch
pip install torch==2.5.1 --index-url https://download.pytorch.org/whl/cu124
Check this issue for more details.
Training
The below training scripts have been tested on 8 H200 GPUs.
Example script for training JiT-B/16 on ImageNet 256x256 for 600 epochs:
torchrun --nproc_per_node=8 --nnodes=1 --node_rank=0 \
main_jit.py \
--model JiT-B/16 \
--proj_dropout 0.0 \
--P_mean -0.8 --P_std 0.8 \
--img_size 256 --noise_scale 1.0 \
--batch_size 128 --blr 5e-5 \
--epochs 600 --warmup_epochs 5 \
--gen_bsz 128 --num_images 50000 --cfg 2.9 --interval_min 0.1 --interval_max 1.0 \
--output_dir ${OUTPUT_DIR} --resume ${OUTPUT_DIR} \
--data_path ${IMAGENET_PATH} --online_eval
Example script for training JiT-B/32 on ImageNet 512x512 for 600 epochs:
torchrun --nproc_per_node=8 --nnodes=1 --node_rank=0 \
main_jit.py \
--model JiT-B/32 \
--proj_dropout 0.0 \
--P_mean -0.8 --P_std 0.8 \
--img_size 512 --noise_scale 2.0 \
--batch_size 128 --blr 5e-5 \
--epochs 600 --warmup_epochs 5 \
--gen_bsz 128 --num_images 50000 --cfg 2.9 --interval_min 0.1 --interval_max 1.0 \
--output_dir ${OUTPUT_DIR} --resume ${OUTPUT_DIR} \
--data_path ${IMAGENET_PATH} --online_eval
Example script for training JiT-H/16 on ImageNet 256x256 for 600 epochs:
torchrun --nproc_per_node=8 --nnodes=1 --node_rank=0 \
main_jit.py \
--model JiT-H/16 \
--proj_dropout 0.2 \
--P_mean -0.8 --P_std 0.8 \
--img_size 256 --noise_scale 1.0 \
--batch_size 128 --blr 5e-5 \
--epochs 600 --warmup_epochs 5 \
--gen_bsz 128 --num_images 50000 --cfg 2.2 --interval_min 0.1 --interval_max 1.0 \
--output_dir ${OUTPUT_DIR} --resume ${OUTPUT_DIR} \
--data_path ${IMAGENET_PATH} --online_eval
Evaluation
PyTorch pre-trained models are available here.
Evaluate pre-trained JiT-B:
torchrun --nproc_per_node=8 --nnodes=1 --node_rank=0 \
main_jit.py \
--model JiT-B/16 (or JiT-B/32) \
--img_size 256 (or 512) --noise_scale 1.0 (or 2.0) \
--gen_bsz 256 --num_images 50000 --cfg 3.0 --interval_min 0.1 --interval_max 1.0 \
--output_dir ${CKPT_DIR} --resume ${CKPT_DIR} \
--data_path ${IMAGENET_PATH} --evaluate_gen
Evaluate pre-trained JiT-L:
torchrun --nproc_per_node=8 --nnodes=1 --node_rank=0 \
main_jit.py \
--model JiT-L/16 (or JiT-L/32) \
--img_size 256 (or 512) --noise_scale 1.0 (or 2.0) \
--gen_bsz 256 --num_images 50000 --cfg 2.4 (or 2.5) --interval_min 0.1 --interval_max 1.0 \
--output_dir ${CKPT_DIR} --resume ${CKPT_DIR} \
--data_path ${IMAGENET_PATH} --evaluate_gen
Evaluate pre-trained JiT-H:
torchrun --nproc_per_node=8 --nnodes=1 --node_rank=0 \
main_jit.py \
--model JiT-H/16 (or JiT-H/32) \
--img_size 256 (or 512) --noise_scale 1.0 (or 2.0) \
--gen_bsz 256 --num_images 50000 --cfg 2.2 (or 2.3) --interval_min 0.1 --interval_max 1.0 \
--output_dir ${CKPT_DIR} --resume ${CKPT_DIR} \
--data_path ${IMAGENET_PATH} --evaluate_gen
We use a customized torch-fidelity
to evaluate FID and IS against a reference image folder or statistics. You can use prepare_ref.py
to prepare the reference image folder, or directly use our pre-computed reference stats
under fid_stats.
Acknowledgements
We thank Google TPU Research Cloud (TRC) for granting us access to TPUs, and the MIT ORCD Seed Fund Grants for supporting GPU resources.
Contact
If you have any questions, feel free to contact me through email (tianhong@mit.edu). Enjoy!