A ComfyUI workflows and models management extension to organize and manage all your workflows, models in one place. Seamlessly switch between workflows, as well as import, export workflows, reuse subworkflows, install models, browse your models in a single workspace.
Key parameters and specifications
Key parameters and specifications
Parameter
Value
Language
Python
Category
Applications
Subcategory
Other
Keywords
Image production
Stars
1,461
Forks
410
Contributors
4
Created date
2017-07-02
Updated date
2026-09-12
Stars in 1 day
0
Stars in 7 days
0
Rank
10,265
Previous rank
10,274
Rank change
9
7-day stars rank
12,568
Previous 7-day stars rank
12,604
7-day stars rank change
36
Total stars rank
8,264
Previous total stars rank
8,251
Total stars rank change
-13
Country
Germany
README summary
face2face-demo This is a pix2pix demo that learns from facial landmarks and translates this into a face. A webcam-enabled application is also provided that translates your face to the trained face in real-time. Generate Training Data Input: is the name of the video file from which you want to create the data set. is the number of train data to be created. is the facial landmark model that is used to detect the landmarks. A pre-trained
facial landmark model is provided here. Output: Two folders and will be created. If you want to download my dataset, here is also the video file that I used and the generated training dataset (400 images already split into training and validation). Train Model For more information around training, have a look at Christopher Hesse's pix2pix-tensorflow implementation. First, we need to reduce the trained model so that we can use an image tensor as input: 2. Second, we freeze
the reduced model to a single file. I have uploaded a pre-trained frozen model here. This model is trained on 400 images with epoch 200. Run Demo Input: is the device index of the camera (default=0). is an option to either display the normal input (0) or the facial landmark (1) alongside the generated image (default=0). is the facial landmark model that is used to detect the landmarks. Example: Requirements Anaconda / Python 3. 4 Acknowledgments Kudos to
Christopher Hesse for his amazing pix2pix TensorFlow implementation and Gene Kogan for his inspirational workshop.
Frequently asked questions
How many stars and forks are recorded?
datitran/face2face-demo has 1,461 stars and 410 forks.
What is the repository rank?
datitran/face2face-demo is ranked 10,265.
What language and category are recorded?
datitran/face2face-demo has 1,461 stars, uses Python and belongs to Applications.
Which repository is closest in rank?
datitran/face2face-demo is compared with buaacyw/GaussianEditor, ranked 10,264 with 1,461 stars.
README
face2face-demo
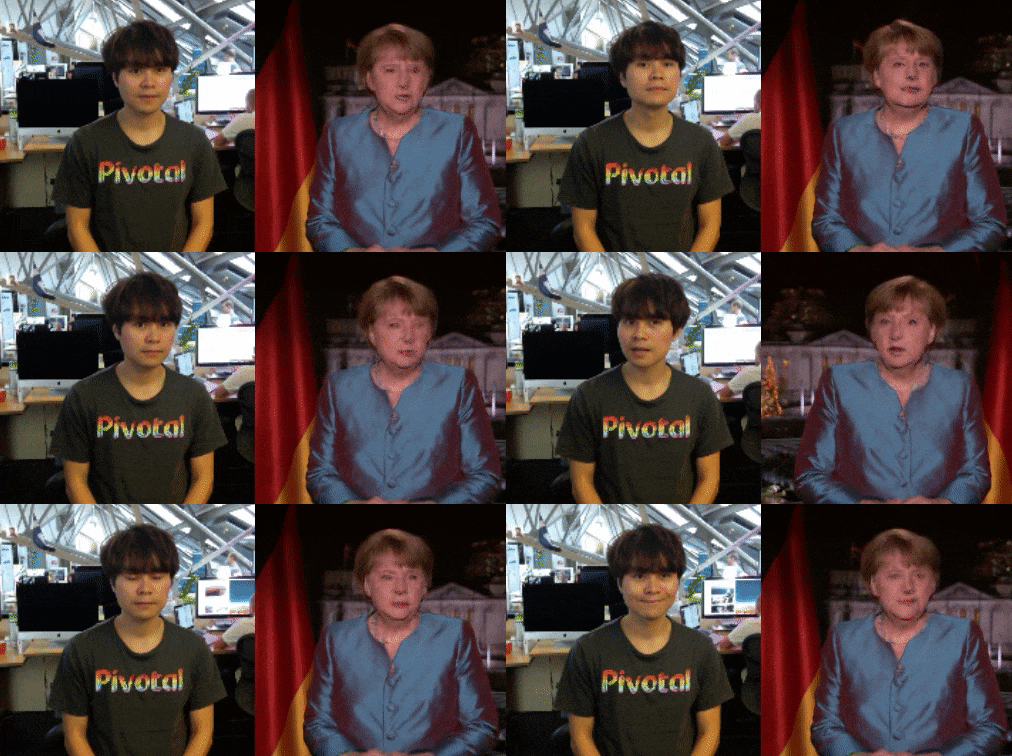
This is a pix2pix demo that learns from facial landmarks and translates this into a face. A webcam-enabled application is also provided that translates your face to the trained face in real-time.
Getting Started
1. Prepare Environment
# Clone this repo
git clone git@github.com:datitran/face2face-demo.git

# Create the conda environment from file (Mac OSX)
conda env create -f environment.yml
file is the name of the video file from which you want to create the data set.
num is the number of train data to be created.
landmark-model is the facial landmark model that is used to detect the landmarks. A pre-trained facial landmark model is provided here.
Output:
Two folders original and landmarks will be created.
If you want to download my dataset, here is also the video file that I used and the generated training dataset (400 images already split into training and validation).
3. Train Model
# Clone the repo from Christopher Hesse's pix2pix TensorFlow implementation
git clone https://github.com/affinelayer/pix2pix-tensorflow.git

# Move the original and landmarks folder into the pix2pix-tensorflow folder
mv face2face-demo/landmarks face2face-demo/original pix2pix-tensorflow/photos

# Go into the pix2pix-tensorflow folder
cd pix2pix-tensorflow/

# Resize original images
python tools/process.py \
  --input_dir photos/original \
  --operation resize \
  --output_dir photos/original_resized

# Resize landmark images
python tools/process.py \
  --input_dir photos/landmarks \
  --operation resize \
  --output_dir photos/landmarks_resized

# Combine both resized original and landmark images
python tools/process.py \
  --input_dir photos/landmarks_resized \
  --b_dir photos/original_resized \
  --operation combine \
  --output_dir photos/combined

# Split into train/val set
python tools/split.py \
  --dir photos/combined

# Train the model on the data
python pix2pix.py \
  --mode train \
  --output_dir face2face-model \
  --max_epochs 200 \
  --input_dir photos/combined/train \
  --which_direction AtoB
For more information around training, have a look at Christopher Hesse's pix2pix-tensorflow implementation.
4. Export Model
First, we need to reduce the trained model so that we can use an image tensor as input: